The following page provides instructions and tips for creating digital video
files from super 8 film scanned with a flatbed scanner. While the quality is
poorer than that achieved with a professional telecine machine,
it is acceptable for casual viewing and archiving of super 8 home movies
and commercial prints.
There are a few other pages on the web provided by other people who have
tried flatbed scanning of super8 film:
8mm2avi
v2005-01-15:
mmsuper8 broken into separate utility programs
v2004-07-25:
Debut beta release to the public.
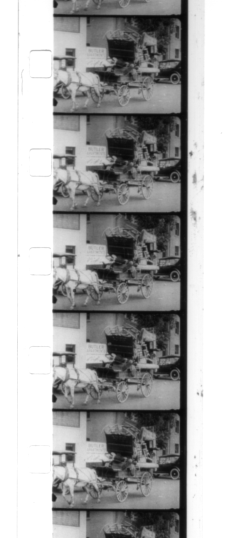
Sample scan from a commercial print
|
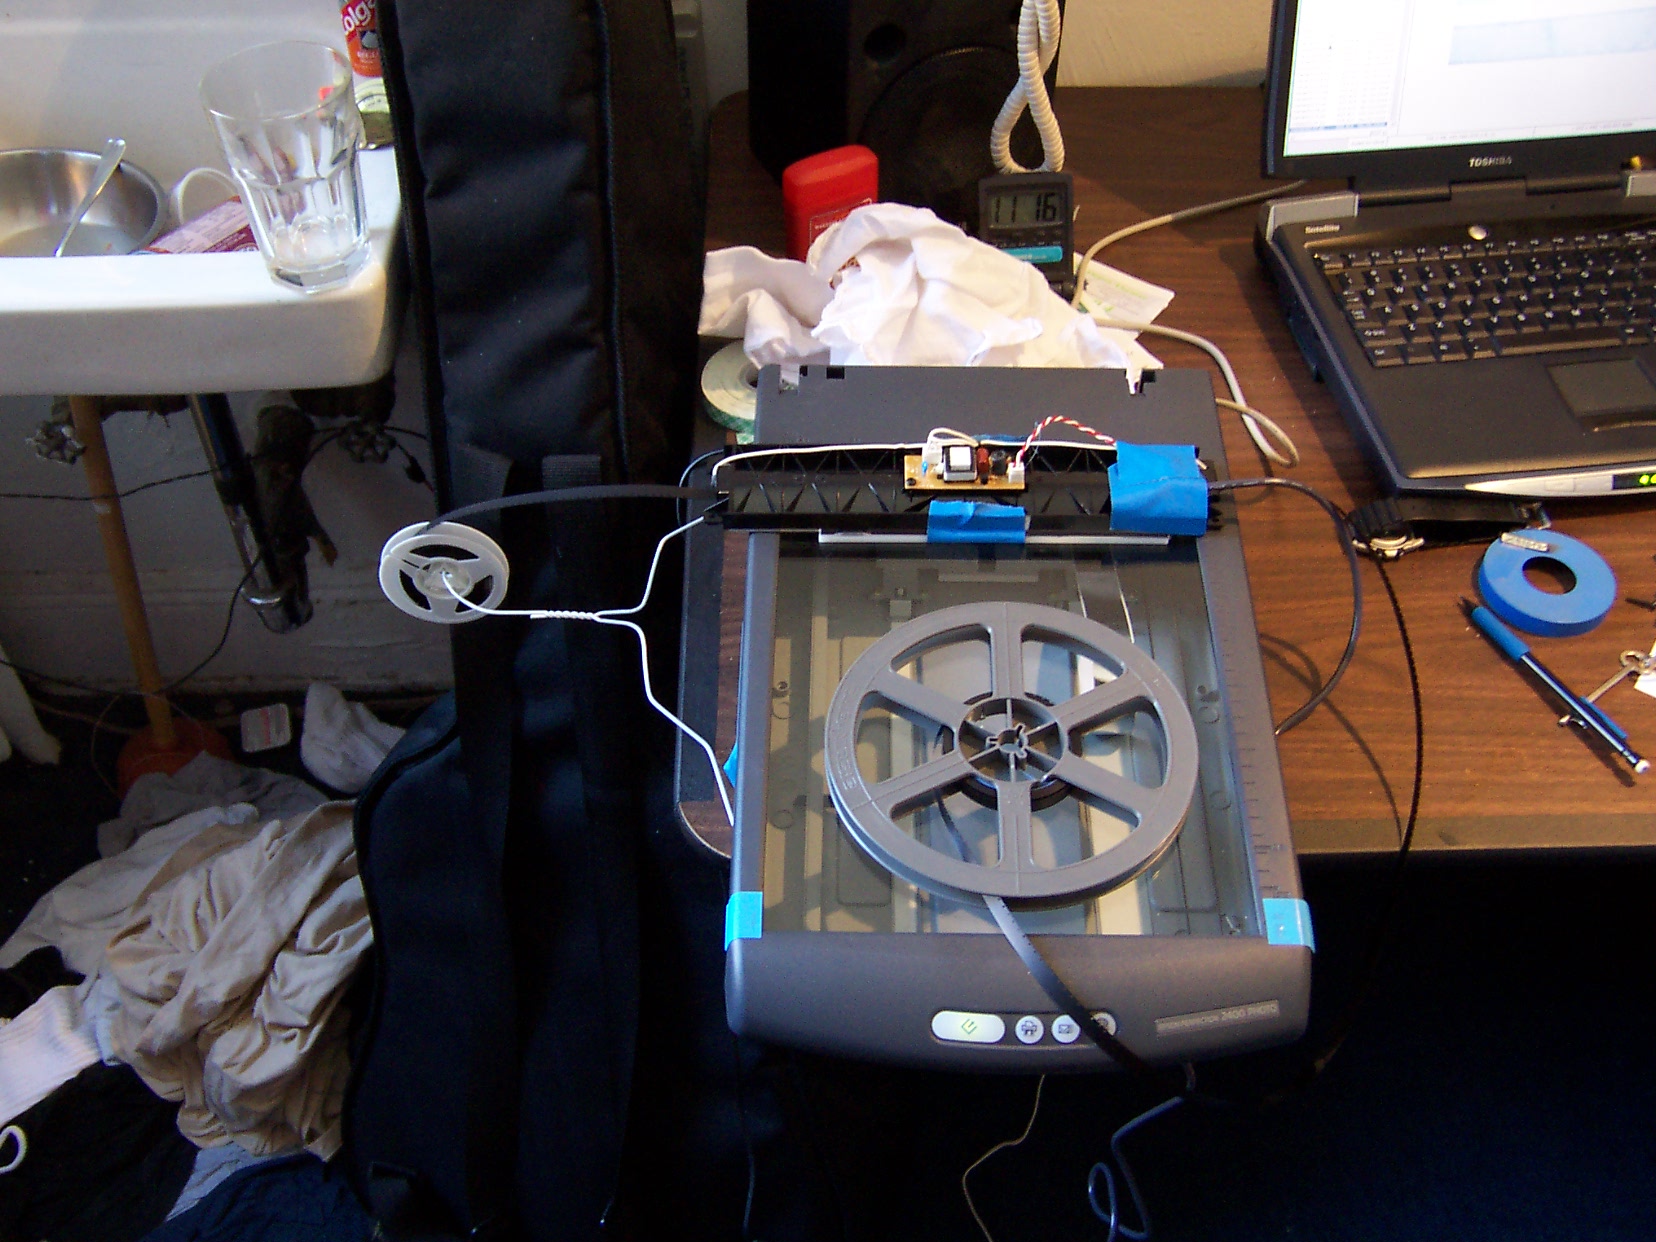
The challenge with scanning is to find a physical setup that will hold the film
steady in the scanning area and make it possible to quickly advance the film between scans.
As the interface between the computer and the physical world with inadequate equipment,
scanning is the most problematic part of the process.
Scanner: The scanner itself should be at minimum capable of 1200 dpi OPTICAL
scan resolution (not interpolation from a lower resolution) with 2400 or 3600 even better
(but slower). I use an Epson Perfection 2400, a USB scanner supported under Linux and providing
2400 DPI resolution.
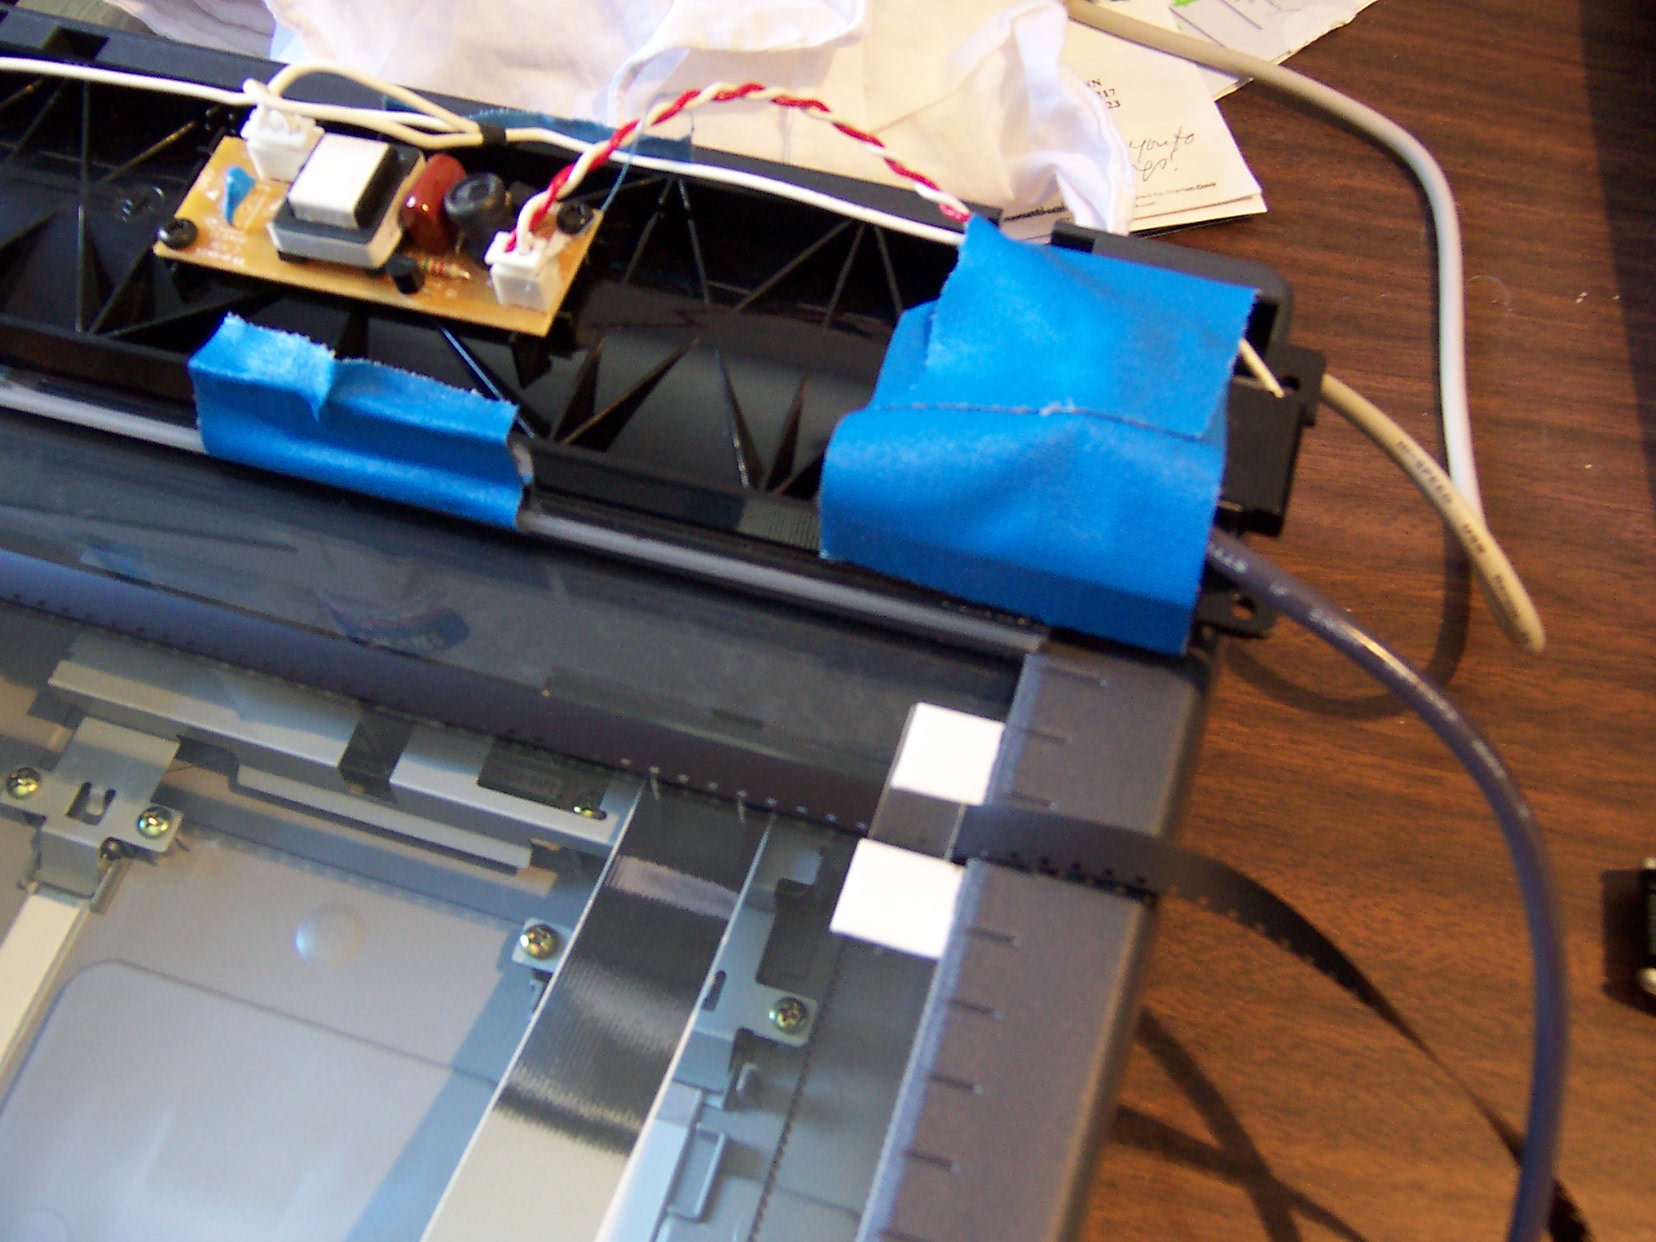
Light Source: You will need some sort of diffuse light source to backlight
the film. Scanners that have transparency adapters built into their
covers usually place them in the same orientation as the scanner glass. Although the results
MAY be more accurate, scanning a high resolution lengthwise (using only a small portion
of the scanning platen) is MUCH slower than scanning sideways (using the full length of the
scanning platen).
Therefore, some way of back illuminating the film must be found. I use an old freestanding
HP ScanJet HPA transparency adapter that I purchased on ebay. To hold the film down on the glass,
I remove the diffuser and light unit from the case to press the film against the glass.
Finding something that will provide a consistent light source is difficult.
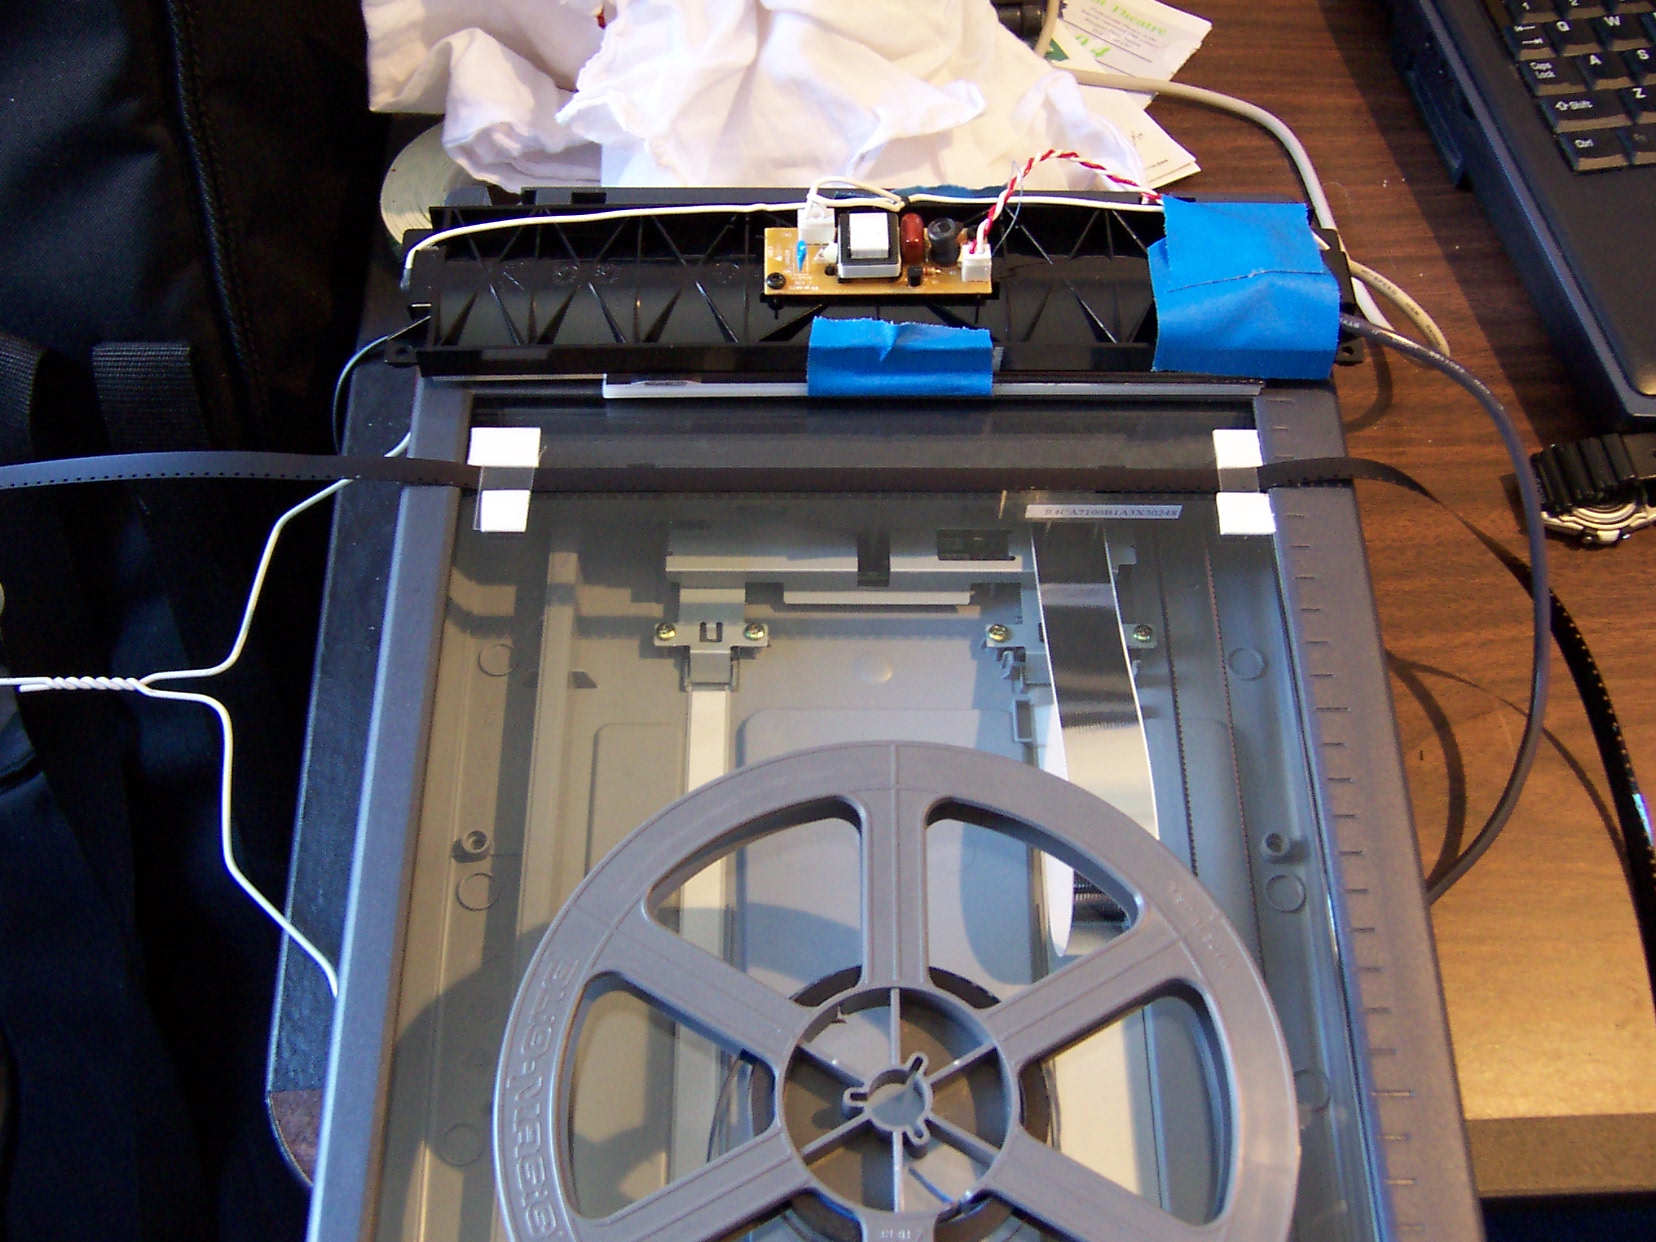
Film Guide: While the mmsuper8 software detects sprocket holes and crops
individual frames, some kind of guide is needed to place the film in a consistent place
on the glass and facilitate pulling an appropriate number of frames through between
scans without and undue number of dropped or duplicated frames. Using foam mounting
tape, I created guides on each side of the scanner. As noted above, scans are performed
sideways, which is much faster than scanning lengthwise.
Scanimage Script: SANE (the Linux Scanner support package) provides the
command line scanimage utility for controlling scanners. This permits using a script to
control scanning and reduce the number of mouse actions and keystrokes that must be performed
for each scan. This will require some tweaking for your individual situation to reduce the
scanned area to the minimum area needed to capture as many frames as possible.
The example given below also uses the pnmflip command since the film is
scanned sideways, but mmsuper8 requires strips of frames that are oriented top to bottom.
index=0
while true; do
filename=`printf "%03d.pnm" $((index))`
echo "press to scan" $filename
read
scanimage --resolution 1200 -l 15 -t 11 -y 11 -x 185 --mode Color > temp.pnm
pnmflip -rotate270 temp.pnm > $filename
rm temp.pnm
index=$((index+1))
done
exit
Although it is usually impossible to get the scanner to run without the scanner lamp
on, this does not adversely affect the quality of most well-exposed film, provided that
there is a consistent light behind the transparency. Dirt and scratches on underexposed
film will reflect light, causing the defects to be light colored in the scan.
Scanners with built-in transparency adapters detect the presence
of the adapter, so you can't use the transparency setting if the lid has been removed. Also
they usually limit the scanning dimensions to the area convered by the transparency adapter,
and as stated above, lengthwise scanning of super 8 film at high resolution is prohibitively
slow.
To detect edges successfully, mmsuper8 requires that the scan strips be oriented
top to bottom and that the left and right areas in the scan be white. The image should
also be cropped so that the frames are usable from top and bottom.
With my physical setup, each scan captures around seven inches (40 frames - around two seconds)
and takes about a minute. At this rate, I can scan a 50-foot roll in around an hour.
mmsuper8frame takes as input scans of super 8 film in pnm files that
are strips of frames oriented top to bottom and have ONLY white area to the left
and right of the film scan (for edge and sprocket hole detection).
mmsuper8frame takes as input one or more pnm files. PNM is an extremely simple,
uncompressed format that is the output of the scanimage program. While this
format consumes a significant amount of space (around 200K/frame at 2400DPI),
it is extremely easy to read, does not use lossy compression, and should
be readable in the future when proprietary format algorithms have been long
forgotten.
mmsuper8frame outputs sequentially numbered PNM files
with one file for each frame (e.g. frame00000.pnm, frame00001.pnm, etc.)
You should try a few sample scans before putting in the effort to scan a
whole roll of film.
mmsuper8frame [options] scan_file.pnm ...
-b
Output will be black and white (i.e. grayscale) (default is color)
-resolution dpi
Specifies image resolution for frame sizing based on dimensions of
standard super8 film. Should be specified even if automatic frame
detection is overridden. (default is 1200)
-clipleft pixels
-clipright pixels
-cliptop pixels
-clipbottom pixels
Crops a given number of pixels from left/right/top/bottom of each frame
These values can be negative.
-nosprocket
Turns off sprocket hole detection and assumes the top of the first
frame is the top of the input image(s) and that subsequent frames
follow at exactly the appropriate frame height for the given resolution.
Useful for scans of commercial prints where sprocket holes are
not detectable in the scan.
-frameoffset pixels
When not using sprocket hole detection, the top of the first frame
is assumed to start at the very top of the scan file. This
parameter can be used when the first frame should start at
a lower location. Value is in pixels and can only be positive.
Note that this parameter turns off sprocket hole detection.
-frameheight pixels
When not using sprocket hole detection, variation in scanner
accuracy will cause frame drift. This parameter can be tweaked
to adjust the spacing between frames. Values are in pixels.
Default is 200 at 1200 DPI. This parameter turns off sprocket
hole detection: -cliptop and -clipbottom should be used for
adjusting framing and/or modifying the size of the output frame.
-framefromright
-framefromleft
Normally a dark left edge is assumed for finding the horizontal
location of a frame. This should also work for commercial
prints that have clear sprocket area since the detected width
will be less than 8mm and the left edge is adjusted accordingly.
However, some commercial prints are framed so the picture area
abuts the clear sprocket area. If the content of the picture
is light, there will be no left edge to detect and horizontal
framing will be incorrect. In those cases, there may be a dark
right border which can be used. -framefromright causes usage
of the right border for framing. The default is framing from
the left and -framefromleft can be used to restore left
framing if -framefromright was given for a previous file in a
list of input files.
-sprocket
Turns sprocket hole detection back on if -nosprocket was given
before a previous input file.
-frameheight pixels
Specifies distance between each frame (used with -frameoffset to
override automatic frame detection)
-frameoffset pixels
Specifies top starting point for frame extraction (used with
-frameheight to override automatic frame detection)
-framenumber number
Starting number for output files (default is 00000)
Examples:
Home Movies: Home movies normally have emulsion covering the entire
width of the film and therefore have white sprocket holes against a black
background. In this scenario, when given the correct resolution, mmusuper8
should be able to detect sprocket holes and create frame files without
any additional parameters. Multiple input strip files can be included
with each invocation of mmsuper8. The following invocation assumes
the strip files are scanned at 1,200 DPI and will create
a sequence of files named frame00001.pnm, frame00002.pnm, etc.
mmsuper8frame strip001.pnm strip002.pnm strip003.pnm
Commercial Print: Commercial super 8 prints often have emulsion
only in the frame area of the film. Therefore, the sprocket area is clear
and mmsuper8 is incapable of detecting sprocket holes. Complicating matters,
the printed image may not be correctly centered in the frame area, making
it impossible to detect the left edge of the film. In these cases,
specific framing information FOR EACH STRIP FILE must be given.
mmsuper8frame -nosprocket -frameoffset 280 -frameheight 397 -framefromright
-clipright 20 -clipleft 20 -resolution 2400 2400_strip.pnm
The example above works with this brief
sample strip. Note
that this strip is in PNG format to save server space since PNM files are
quite large. It needs to be converted from PNG to PNM with gimp or some
other image processing utility. An brief example of this
strip converted to a movie (in RealVideo format) is given
here.
- -nosprocket: turns off automatic sprocket hole detection
- -frameoffset 280: indicates that the top of the first frame in the strip
starts at y pixel 280. Since it is very difficult to accurately scan the film
with the top of the frame matching the top of the scan, this will probably
change with each strip scan file.
- -frameheight 397: At 2,400 DPI, frames should be 400 pixels high. However,
scans are rarely perfect and frameheight must be tweaked so the framing does
not shift as mmsuper8 progresses down the strip. Note that this does not
adjust the actual height of the extracted frame; cliptop and/or clipbottom must
be used for that, although the default is usually fine.
- -framefromright: This particular print has a poorly centered frame and
the frame bleeds over left edge, which is normally used to find the edge of the film.
As such, when the frame content is lightly colored, it is impossible to detect
where the edge starts. However, the right edge is consistently dark, so this
flag indicates to use the right edge
- -clipright 20 -clipleft 20: The mmsuper8 default frame width will normally
capture the entire frame area width. However, in this example, because the
left and right edges of the film are clear and because of the the poor frame
centering of the print, the left and right edges are cropped to remove extraneous
material.
- -resolution 2400: mmsuper8 defaults to 1200 DPI and will not attempt
to infer DPI from the scan file since PNM file headers do not include any
DPI information. -resolution MUST be specified if the scan is anything other
than 1200 DPI.
The mmsuper8 package include mmsuper8play, a simple X-Windows player for
playing individual PNM frame files. Since this reads files on demand and
does not attempt to sync with the refresh rate of the display, playback rate
is inaccurate and unstable. However, it is useful for previewing and editing
frame content prior to conversion to .mov or .avi. mmsuper8play uses the following
keystrokes:
- Left Arrow: decreases frame rate by 3 FPS. This can also move to a negative
rate that plays backwards.
- Right Arrow: increases frame rate by 3 FPS.
- Space: Pauses/restarts playback
- Home: Go to beginning frame
- End: Go to last frame
- PgUp: Advance one second (18 frames)
- PgDown: Back up one second (18 frames)
Although mmsuper8frame will converting scan strips to individual frame files
for editing or archiving, the final viewable product will need to be some video
format. mmsuper8mov can be used to combine frame files into uncompressed
Quicktime files:
mmsuper8mov [options] frame_file ...
-o output_file
Specifies name of output file (default is movie.mov)
-b
Output file should be black-and-white (i.e. grayscale)
-rate fps
Specifies frame rate (default is 18 bps)
The example below uses a wildcard to specify multiple frame files.
If the frame files are anything other than 1200 DPI, -resolution must be specified.
There appears to be a size limit on .mov files (that mmsuper8 does not detect),
which limits the size of uncompressed movies created with high-resolution files
to only a few seconds. In those cases, it is probably best to create a multiple
short .mov files, combine them with some video editing software and then save
the composite file in a compressed format that uses space more efficiently.
mmsuper8 frame*.pnm -resolution 2400 -o final_movie.mov
Although they conform to the published file formats,
the video output files created by mmsuper8 do not play on
the Windoze media player (.avi), Widoze Quicktime player (.mov) or the
RealPlayer on any platform. Players on Windoze are closed source
and the error messages issued by the players are too inspecific
to diagnose the problem further.
.mov files can be played with lqtplay, a simple player that is part of the
libquicktime package. The .mov files do not play on mplayer.
RealProducer can import uncompressed .mov files and output compressed .rm files
that can be streamed on the internet. You can download a Linux tarball
from
the Real.com website.
realproducer -i movie.mov -o movie.rm -t 8 -f 0 -b "Title" -h "Author" -c "(c) 2004 by Author"
I assume that digital video editing software can import .mov or
.avi files, although I have never tried.
mmsuper8avi combines .ppm/.pgm/.pnm frame files into a single
uncompressed .avi movie file. Strips of frames MUST first be separated
into single-frame files with mmsuper8frame.
mmsuper8avi - Combines .ppm/.pgm/.pnm frames into a single uncompressed .avi movie file
mmsuper8avi [options] framefile...
-o output_file
Specifies name of output file (default is movie.avi)
-b
Output file should be black-and-white (i.e. grayscale)
-rate fps
Specifies frame rate (default is 18 bps)
On Linux, the .avi players play with mplayer.
Although they conform to the published file formats,
the video output files created by mmsuper8 do not play on
the Windoze media player (.avi), Widoze Quicktime player (.mov) or the
RealPlayer on any platform. Players on Windoze are closed source
and the error messages issued by the players are too inspecific
to diagnose the problem further.
mmsuper8list performs a list of the chunks (.avi)
or atoms (.mov) in a video file. This utility was part of my work
figuring out how to create .avi and .mov files is provided for diagnosing
problems or examining the content of existing .avi or .mov files.
mmsuper8normalize normalizes colors in frame files.
With no options, mmsuper8normalize simply finds the high and low values
for each color and redistributes the intensity values across the given range.
This usually improves the saturation and color balance for old films with
faded colors and scans with poor levels. However, this can introduce
additional flicker since normalization will be affected by dust, scratches
and inconsistencies in scanner source light over the length of a scan.
Specific min/max values can be specified for each color. Optimal settings
can be determined by trial and error or by experimenting on a single frame
with the levels color tool in Gimp.
Finally, after color correction, a new midpoint for luminance distribution
can be specified. This effectively lightens or darkens the final image.
mmsuper8normalize [options] frame_file ...
-red min max
Overrides automatic detection of min/max red color values
-green min max
Overrides automatic detection of min/max red color values
-blue min max
Overrides automatic detection of min/max red color values
-mid midpoint
Specifies midpoint for adjusting luminance after normalization
mmsuper8deflicker adjusts luminance midpoint on a series of
frame files so each frame has the same average overall luminance.
Scanners and scanning light sources are rarely even across the length
of a strip of film. This utility may not be very effective with
groups of frames with large amounts of motion or widely changing
levels of darkness.
mmsuper8deflicker [-l red green blue gray] frame_file ...
-l specify desired luminance values (do not compute an average from all frames)
Luminance values (if specified) are 0 - 255. You can find the luminance
of a frame you like by running mmsuper8deflicker on that frame and
reading the values printed by the program. Those values can then
be applied to the rest of the frames.
mmsuper8jitter adds jitter, flicker and grain to a
sequence of frame files to create the illusion of an early 20th
century film. This should be used on files with individual frames,
NOT scan files that contain strips of frames.
mmsuper8jitter [options] [pnmfile1 pnmfile2 ...]
-jitter (pixels)
Simulates worn sprocket holes which cause steady
images to jitter slightly. Specifies the maximum
value for random frame position shift between frames.
Default is 1 pixel. Larger values look more like
an earthquake than jitter. Value of 0 turns off
this effect.
-flicker (level)
Simulates random variability in image intensity
caused by inconsistent film sensitivity and
inconsistent frame exposure times. Specifies a
maximum value for random intensity value added to
each frame, assuming 8-bit images with an intensity
range of 0 - 255. Default is 16. Value of 0
turns off this effect.
-grainlevel (grain level)
-graincount (grain count)
Simulates film grain by adding random points of
intensity to the image. Specifies the maximum intensity
of each point (assuming 8-bit depth). Default level
is 12 and default count is width * height * 2.
mmsuper8dejitter removes inter-frame jitter and flicker.
It works by performing correlation between frames and shifting
frames to achieve maximum correlation. As such, it is really only
useful on scenes that are largely static. It also most effective
only when used on frames that constitute a single scene; it should
not be run on frames that constitute multiple scenes. It does
not crop the edges which will will look strange with extraneous material.
mmsuper8dejitter - Uses correlation to remove interframe jitter.
Best on frames with limited motion.
mmsuper8dejitter max_shift pnmfile1 pnmfile2 ...
max_shift is in number of pixels.
����������������������������������������������������������������������������������������������������������������������������������������������������������������������������������������������������������������������������������������������������������������������������������������������������������������������������������������������������������������������������������������������������������������������������������������������������������������������������������������������������������mmsuper8/mmsuper8normalize.cpp����������������������������������������������������������������������0100644�0000764�0000764�00000006741�10172274563�016661� 0����������������������������������������������������������������������������������������������������ustar �michael�������������������������michael����������������������������������������������������������������������������������������������������������������������������������������������������������������������������������������������������������������/***************************************************************************
mmsuper8normalize - Normalizes colors in .ppm/.pgm/.pnm frame files
-------------------
begin : 5/31/2004, 1/15/2005
copyright : (C) 2004 by Michael Minn
email : see www.michaelminn.com
-------------------
***************************************************************************/
#include
#include "mmpnm.h"
int print_syntax()
{
fprintf(stderr, "mmsuper8normalize - Normalizes colors in .ppm/.pgm/.pnm frame files\n\n");
fprintf(stderr, "mmsuper8normalize [options] frame_file ...\n\n");
fprintf(stderr, " -red min max\n");
fprintf(stderr, " Overrides automatic detection of min/max red color values\n\n");
fprintf(stderr, " -green min max\n");
fprintf(stderr, " Overrides automatic detection of min/max red color values\n\n");
fprintf(stderr, " -blue min max\n");
fprintf(stderr, " Overrides automatic detection of min/max red color values\n\n");
fprintf(stderr, " -mid midpoint\n");
fprintf(stderr, " Specifies midpoint for adjusting luminance after normalization\n\n");
return 0;
}
int main(int argc, char **argv)
{
int normalize = 0;
int midpoint = -1;
int color_high[3] = { 255, 255, 255 };
int color_low[3] = { 0, 0, 0 };
fprintf(stderr, "mmsuper8normalize %s\n", VERSION);
int frame_count = 0;
for (int argument = 1; argument < argc; ++argument)
if (strncmp(argv[argument], "-n", 2) == 0)
normalize = 1;
else if (strstr(argv[argument], "-red") && ((argument + 2) < argc))
{
color_low[0] = atoi(argv[argument + 1]);
color_high[0] = atoi(argv[argument + 2]);
argument += 2;
fprintf(stderr, "Expanding red between %d and %d\n", color_low[0], color_high[0]);
}
else if (strstr(argv[argument], "-green") && ((argument + 2) < argc))
{
color_low[1] = atoi(argv[argument + 1]);
color_high[1] = atoi(argv[argument + 2]);
argument += 2;
fprintf(stderr, "Expanding green between %d and %d\n", color_low[1], color_high[1]);
}
else if (strstr(argv[argument], "-blue") && ((argument + 2) < argc))
{
color_low[2] = atoi(argv[argument + 1]);
color_high[2] = atoi(argv[argument + 2]);
argument += 2;
fprintf(stderr, "Expanding blue between %d and %d\n", color_low[2], color_high[2]);
}
else if (strstr(argv[argument], "-mid") && ((argument + 1) < argc))
{
midpoint = atoi(argv[argument + 1]);
argument += 1;
fprintf(stderr, "Setting luminance midpoint to %d\n", midpoint);
}
else if (strstr(argv[argument], ".ppm")
|| strstr(argv[argument], ".pgm")
|| strstr(argv[argument], ".pnm"))
{
mmpnm_file file;
if (file.load(argv[argument]) < 0)
continue;
else if (file.width < file.height)
fprintf(stderr, " File does not seem to be a single frame image\n");
else
{
fprintf(stderr, "%s: %d x %d\n", argv[argument], file.width, file.height);
file.normalize_gray();
for (int color = 0; color < 3; ++color)
if ((color_low[color] > 0) || (color_high[color] < 255))
file.adjust_color(color, color_low[color], color_high[color]);
else
file.normalize_color(color);
if (midpoint > 0)
for (int color = 0; color < 4; ++color)
file.adjust_midpoint(color, midpoint);
file.save(argv[argument]);
++frame_count;
}
}
else
{
fprintf(stderr, "Invalid argument: %s\n", argv[argument]);
return print_syntax();
}
fprintf(stderr, "%d frames processed\n", frame_count);
return 0;
}
�������������������������������mmsuper8/mmsuper8deflicker.cpp����������������������������������������������������������������������0100644�0000764�0000764�00000007315�10172346542�016604� 0����������������������������������������������������������������������������������������������������ustar �michael�������������������������michael����������������������������������������������������������������������������������������������������������������������������������������������������������������������������������������������������������������/***************************************************************************
mmsuper8deflicker - Adjusts luminance midpoint of series of frames
so each has the same average overall luminance
-------------------
begin : 5/31/2004, 1/15/2005
copyright : (C) 2004 by Michael Minn
email : see www.michaelminn.com
-------------------
***************************************************************************/
#include
#include "mmpnm.h"
int print_syntax()
{
fprintf(stderr, "mmsuper8deflicker - Adjusts luminance midpoint so each PNM/PGM/PPM frame\n");
fprintf(stderr, " in a series of frames has the same average overall luminance\n");
fprintf(stderr, "mmsuper8deflicker [-l red green blue gray] frame_file ...\n\n");
fprintf(stderr, " -l specify desired luminance values (do not compute an average from all frames)\n");
return 0;
}
int main(int argc, char **argv)
{
int average[4] = {0,0,0,0};
int frame_count = 0;
fprintf(stderr, "mmsuper8deflicker %s\n", VERSION);
for (int argument = 1; argument < argc; ++argument)
if (!strcmp(argv[argument], "-l") && ((argument + 4) < argc))
{
average[0] = atoi(argv[argument + 1]);
average[1] = atoi(argv[argument + 2]);
average[2] = atoi(argv[argument + 3]);
average[3] = atoi(argv[argument + 4]);
argument = argc;
}
else if (!strstr(argv[argument], ".ppm")
&& !strstr(argv[argument], ".pgm")
&& !strstr(argv[argument], ".pnm"))
return print_syntax();
else
{
mmpnm_file file;
if (file.load(argv[argument]) < 0)
continue;
else if (file.width < file.height)
fprintf(stderr, "File %s does not seem to be a single frame image\n", argv[argument]);
else
{
int luminance[4];
for (int color = 0; color < 4; ++color)
{
luminance[color] = file.find_average_luminance(color);
average[color] += luminance[color];
}
fprintf(stderr, "%s: %d x %d (luminance %d %d %d %d)\n", argv[argument], file.width, file.height,
luminance[0], luminance[1], luminance[2], luminance[3]);
++frame_count;
}
}
for (int color = 0; (color < 4) && frame_count; ++color)
average[color] /= frame_count;
fprintf(stderr, "Average luminance: %d %d %d %d\n", average[0], average[1], average[2], average[3]);
frame_count = 0;
for (int argument = 1; argument < argc; ++argument)
{
mmpnm_file file;
if (file.load(argv[argument]) < 0)
continue;
else if (file.width < file.height)
fprintf(stderr, "File %s does not seem to be a single frame image\n", argv[argument]);
else
{
int midpoint[4] = {127, 127, 127, 127};
for (int color = 0; color < 4; ++color)
{
int luminance = file.find_average_luminance(color);
while ((luminance < average[color]) && (midpoint[color] < 254))
{
mmpnm_file work;
work.copy(&file);
--midpoint[color];
work.adjust_midpoint(color, midpoint[color]);
luminance = work.find_average_luminance(color);
printf(" Midpoint %d for color %d = luminance %d\n", midpoint[color], color, luminance);
}
while ((luminance > average[color]) && (midpoint[color] > 1))
{
mmpnm_file work;
work.copy(&file);
++midpoint[color];
work.adjust_midpoint(color, midpoint[color]);
luminance = work.find_average_luminance(color);
printf(" Midpoint %d for color %d = luminance %d\n", midpoint[color], color, luminance);
}
file.adjust_midpoint(color, midpoint[color]);
}
fprintf(stderr, "%s: Adjusted midpoints %d %d %d %d ==========================\n", argv[argument],
midpoint[0], midpoint[1], midpoint[2], midpoint[3]);
file.save(argv[argument]);
++frame_count;
}
}
fprintf(stderr, "%d frames processed\n", frame_count);
return 0;
}
�������������������������������������������������������������������������������������������������������������������������������������������������������������������������������������������������������������������������������������������������������������������������������������������������������������������mmsuper8/mmsuper8list.cpp���������������������������������������������������������������������������0100644�0000764�0000764�00000001707�10172270472�015624� 0����������������������������������������������������������������������������������������������������ustar �michael�������������������������michael����������������������������������������������������������������������������������������������������������������������������������������������������������������������������������������������������������������/***************************************************************************
mmsuper8list - Lists .avi or .mov chunks
-------------------
begin : 5/31/2004, 1/15/2005
copyright : (C) 2004 by Michael Minn
email : see www.michaelminn.com
-------------------
***************************************************************************/
/*
#include
#include
#include
#include
#include
#include
#include
#include
#include
#include
#include "mmpnm.h"
*/
#include "mmavi.h"
#include "mmquicktime.h"
int print_syntax()
{
fprintf(stderr, "SYNTAX: mmsuper8list <.avi file | .mov file>\n");
return 0;
}
int main(int argc, char **argv)
{
if (argc != 2)
return print_syntax();
if (strstr(argv[1], ".mov"))
mmquicktime_list(argv[1]);
else
mmavi_list(argv[1]);
return 0;
}
���������������������������������������������������������mmsuper8/mmsuper8frame.cpp��������������������������������������������������������������������������0100644�0000764�0000764�00000021327�10172265035�015742� 0����������������������������������������������������������������������������������������������������ustar �michael�������������������������michael����������������������������������������������������������������������������������������������������������������������������������������������������������������������������������������������������������������/***************************************************************************
mmsuper8.cpp - Converts PNM scans of super 8 film to MOV
-------------------
begin : 5/31/2004
copyright : (C) 2004-2005 by Michael Minn
email : see http://www.michaelminn.com
-------------------
This program is free software; you can redistribute it and/or modify
it under the terms of version 2 of the GNU General Public License as
published by the Free Software Foundation.
Super 8 dimensions (from http://member.melbpc.org.au/~cksm/Formats.html)
with pixel dimensions at 1200 DPI:
Film width: 0.314 in (377px)
Frame height: 0.1667in (200px)
Frame width: 0.231 (277px)
Picture width: 0.228 in
Picture height: 0.163in
Left margin (sprocket area): 0.058in (70px)
Right margin (sound stripe): 0.025in (30px)
Sprocket hole height: 0.045in (54px)
Sprocket hole width: 0.036in (43px)
Sprocket to edge: 0.020in (24px)
www.heroinewarrior.com/quicktime.php3
smbclient //toshiba1905/frank -I 192.168.1.1 -U frank
an invalid sample number was found in the movie
***************************************************************************/
#include
#include
#include
#include
#include
#include
#include
#include
#include
#include
#include "mmpnm.h"
#include "mmavi.h"
#include "mmquicktime.h"
/************************************************************************
Command Line Interface
************************************************************************/
int print_syntax()
{
fprintf(stderr, "mmsuper8frame [options] scan_file.pnm ...\n\n");
fprintf(stderr, " -b\n");
fprintf(stderr, " Output will be black and white (i.e. grayscale) (default is color)\n\n");
fprintf(stderr, " -resolution dpi\n");
fprintf(stderr, " Specifies image resolution for frame sizing based on dimensions of\n");
fprintf(stderr, " standard super8 film. Should be specified even if automatic frame \n");
fprintf(stderr, " detection is overridden. (default is 1200)\n\n");
fprintf(stderr, " -clipleft pixels\n");
fprintf(stderr, " -clipright pixels\n");
fprintf(stderr, " -cliptop pixels\n");
fprintf(stderr, " -clipbottom pixels\n");
fprintf(stderr, " Crops a given number of pixels from left/right/top/bottom of each frame\n");
fprintf(stderr, " These values can be negative.\n\n");
fprintf(stderr, " -nosprocket\n");
fprintf(stderr, " Turns off sprocket hole detection and assumes the top of the first\n");
fprintf(stderr, " frame is the top of the input image(s) and that subsequent frames\n");
fprintf(stderr, " follow at exactly the appropriate frame height for the given resolution.\n");
fprintf(stderr, " Useful for scans of commercial prints where sprocket holes are\n");
fprintf(stderr, " not detectable in the scan. \n\n");
fprintf(stderr, " -frameoffset pixels\n");
fprintf(stderr, " When not using sprocket hole detection, the top of the first frame\n");
fprintf(stderr, " is assumed to start at the very top of the scan file. This \n");
fprintf(stderr, " parameter can be used when the first frame should start at\n");
fprintf(stderr, " a lower location. Value is in pixels and can only be positive.\n");
fprintf(stderr, " Note that this parameter turns off sprocket hole detection.\n\n");
fprintf(stderr, " -frameheight pixels\n");
fprintf(stderr, " When not using sprocket hole detection, variation in scanner\n");
fprintf(stderr, " accuracy will cause frame drift. This parameter can be tweaked\n");
fprintf(stderr, " to adjust the spacing between frames. Values are in pixels.\n");
fprintf(stderr, " Default is 200 at 1200 DPI. This parameter turns off sprocket\n");
fprintf(stderr, " hole detection: -cliptop and -clipbottom should be used for \n");
fprintf(stderr, " adjusting framing and/or modifying the size of the output frame.\n\n");
fprintf(stderr, " -framefromright\n");
fprintf(stderr, " -framefromleft\n");
fprintf(stderr, " Normally a dark left edge is assumed for finding the horizontal\n");
fprintf(stderr, " location of a frame. This should also work for commercial\n");
fprintf(stderr, " prints that have clear sprocket area since the detected width\n");
fprintf(stderr, " will be less than 8mm and the left edge is adjusted accordingly.\n");
fprintf(stderr, " However, some commercial prints are framed so the picture area\n");
fprintf(stderr, " abuts the clear sprocket area. If the content of the picture \n");
fprintf(stderr, " is light, there will be no left edge to detect and horizontal\n");
fprintf(stderr, " framing will be incorrect. In those cases, there may be a dark\n");
fprintf(stderr, " right border which can be used. -framefromright causes usage\n");
fprintf(stderr, " of the right border for framing. The default is framing from\n");
fprintf(stderr, " the left and -framefromleft can be used to restore left\n");
fprintf(stderr, " framing if -framefromright was given for a previous file in a \n");
fprintf(stderr, " list of input files.\n\n");
fprintf(stderr, " -sprocket\n");
fprintf(stderr, " Turns sprocket hole detection back on if -nosprocket was given\n");
fprintf(stderr, " before a previous input file.\n\n");
fprintf(stderr, " -frameheight pixels\n");
fprintf(stderr, " Specifies distance between each frame (used with -frameoffset to\n");
fprintf(stderr, " override automatic frame detection)\n\n");
fprintf(stderr, " -frameoffset pixels\n");
fprintf(stderr, " Specifies top starting point for frame extraction (used with \n");
fprintf(stderr, " -frameheight to override automatic frame detection)\n\n");
fprintf(stderr, " -framenumber number\n");
fprintf(stderr, " Starting number for output files (default is 00000)\n");
return 0;
}
int main(int argc, char **argv)
{
int color = 1;
int frame_count = 0;
mmpnm_framing parameters;
fprintf(stderr, "%s\n", VERSION);
for (int argument = 1; argument < argc; ++argument)
if (strncmp(argv[argument], "-h", 2) == 0)
return print_syntax();
else if (strcmp(argv[argument], "-b") == 0)
{
color = 0;
fprintf(stderr, "Output will be black and white (grayscale)\n");
}
else if (strstr(argv[argument], "-resolution") && ((argument + 1) < argc))
{
++argument;
parameters.set_resolution(atoi(argv[argument]));
}
else if (strstr(argv[argument], "-clipleft"))
{
++argument;
parameters.clip_left = ((atoi(argv[argument]) + 1) & 0xfffffffe);
}
else if (strstr(argv[argument], "-clipright"))
{
++argument;
parameters.clip_right = ((atoi(argv[argument]) + 1) & 0xfffffffe);
}
else if (strstr(argv[argument], "-cliptop"))
{
++argument;
parameters.clip_top = atoi(argv[argument]);
}
else if (strstr(argv[argument], "-clipbottom"))
{
++argument;
parameters.clip_bottom = atoi(argv[argument]);
}
else if (strstr(argv[argument], "-framenumber"))
{
++argument;
frame_count = atoi(argv[argument]);
}
else if (strstr(argv[argument], "-frameheight"))
{
++argument;
parameters.ignore_sprocket_holes = 1;
parameters.frame_height = atof(argv[argument]);
if (parameters.frame_height <= 0)
{
fprintf(stderr, "Invalid frame height given %f\n",
parameters.frame_height);
return print_syntax();
}
}
else if (strstr(argv[argument], "-frameoffset"))
{
++argument;
parameters.ignore_sprocket_holes = 1;
parameters.frame_offset = atoi(argv[argument]);
if (parameters.frame_offset < 0)
{
fprintf(stderr, "Invalid frame offset given %d\n", parameters.frame_offset);
return print_syntax();
}
}
else if (strstr(argv[argument], "-framefromright"))
parameters.frame_from_right = 1;
else if (strstr(argv[argument], "-framefromleft"))
parameters.frame_from_right = 0;
else if (strstr(argv[argument], "-nosprocket"))
parameters.ignore_sprocket_holes = 1;
else if (strstr(argv[argument], "-sprocket"))
parameters.ignore_sprocket_holes = 0;
else if (strstr(argv[argument], ".ppm")
|| strstr(argv[argument], ".pgm")
|| strstr(argv[argument], ".pnm"))
{
mmpnm_file file;
if (file.load(argv[argument]) >= 0)
{
fprintf(stderr, "%s: %d x %d\n", argv[argument], file.width, file.height);
if ((file.width < parameters.film_width) || (file.width > file.height))
fprintf(stderr, " Input file does not seem to be a strip of frames\n");
else
{
mmpnm_file *frames = NULL;
file.convert_to_frames(frames, parameters);
frame_count = frames->save_frames_to_separate_files(!color, frame_count);
frames->delete_list();
}
}
}
else
{
fprintf(stderr, "Invalid argument: %s\n", argv[argument]);
return print_syntax();
}
fprintf(stderr, "%d frames saved\n", frame_count);
return 0;
}
���������������������������������������������������������������������������������������������������������������������������������������������������������������������������������������������������������������������������������������������������������������������������������������������������������mmsuper8/mmsuper8avi.cpp����������������������������������������������������������������������������0100644�0000764�0000764�00000006270�10172267254�015434� 0����������������������������������������������������������������������������������������������������ustar �michael�������������������������michael����������������������������������������������������������������������������������������������������������������������������������������������������������������������������������������������������������������/***************************************************************************
mmsuper8avi.cpp - Converts PNM super8 frame scans to a .AVI file
-------------------
begin : 5/31/2004, 1/15/2005
copyright : (C) 2004 by Michael Minn
email : see www.michaelminn.com
-------------------
***************************************************************************/
#include
#include
#include
#include
#include
#include
#include
#include
#include
#include
#include "mmpnm.h"
#include "mmquicktime.h"
#include "mmavi.h"
/************************************************************************
Command Line Interface
************************************************************************/
int print_syntax()
{
fprintf(stderr, "mmsuper8avi - Combines .ppm/.pgm/.pnm frames into a single uncompressed .avi movie file\n\n");
fprintf(stderr, "mmsuper8avi [options] framefile...\n\n");
fprintf(stderr, " -o output_file \n");
fprintf(stderr, " Specifies name of output file (default is movie.avi)\n\n");
fprintf(stderr, " -b\n");
fprintf(stderr, " Output file should be black-and-white (i.e. grayscale)\n\n");
fprintf(stderr, " -rate fps\n");
fprintf(stderr, " Specifies frame rate (default is 18 bps)\n");
return 0;
}
int main(int argc, char **argv)
{
int frames_per_second = 18;
int color_mode = MMQUICKTIME_COLOR_MODE_RGB;
char *output_filename = "movie.avi";
fprintf(stderr, "%s\n", VERSION);
// First pass through arguments for options
for (int argument = 1; argument < argc; ++argument)
if (strstr(argv[argument], "-o") && ((argument + 1) < argc))
{
++argument;
output_filename = argv[argument];
}
else if (strstr(argv[argument], "-rate") && ((argument + 1) < argc))
{
++argument;
frames_per_second = atoi(argv[argument]);
}
else if (strcmp(argv[argument], "-b") == 0)
{
color_mode = MMQUICKTIME_COLOR_MODE_GRAY;
fprintf(stderr, "Output will be black and white (grayscale)\n");
}
else if (strncmp(argv[argument], "-h", 2) == 0)
return print_syntax();
else if (strstr(argv[argument], ".ppm")
|| strstr(argv[argument], ".pgm")
|| strstr(argv[argument], ".pnm"))
continue; // processed below in 2nd pass
else
{
fprintf(stderr, "Invalid argument: %s\n", argv[argument]);
return print_syntax();
}
// Open output file if one is given
mmavi_file avi_file;
if (avi_file.open_file(output_filename, color_mode, frames_per_second) < 0)
return -1;
// Second pass through arguments to process input files and context sensitive parameters
int frame_count = 0;
for (int argument = 1; argument < argc; ++argument)
if (argv[argument][0] != '-')
{
mmpnm_file file;
if (file.load(argv[argument]) >= 0)
{
fprintf(stderr, "%s: %d x %d\n", argv[argument], file.width, file.height);
if (file.width < file.height)
fprintf(stderr, " File does not appear to be a frame file\n");
else
{
avi_file.add_frame(&file);
++frame_count;
}
}
}
avi_file.close_file();
fprintf(stderr, "%d frames saved\n", frame_count);
return 0;
}
����������������������������������������������������������������������������������������������������������������������������������������������������������������������������������������������������������������������������������������������������������������������������������������������������������������������������������������mmsuper8/mmsuper8jitter.cpp�������������������������������������������������������������������������0100644�0000764�0000764�00000005052�10172300461�016137� 0����������������������������������������������������������������������������������������������������ustar �michael�������������������������michael����������������������������������������������������������������������������������������������������������������������������������������������������������������������������������������������������������������/***************************************************************************
mmsuper8jitter.cpp - Adds jitter and grain noise
-------------------
begin : 7/6/2004
copyright : (C) 2004 by Michael Minn
email : see www.michaelminn.com
-------------------
This program is free software; you can redistribute it and/or modify
it under the terms of version 2 of the GNU General Public License as
published by the Free Software Foundation.
***************************************************************************/
#include
#include
#include "mmpnm.h"
#define MMSUPER8_DEFAULT_JITTER 1
#define MMSUPER8_DEFAULT_FLICKER 16
#define MMSUPER8_DEFAULT_GRAIN_LEVEL 12
int print_syntax()
{
fprintf(stderr, "SYNTAX: mmsuper8jitter [options] [pnmfile1 pnmfile2 ...]\n"
" Options:\n"
" -jitter \n"
" -flicker \n"
" -grainlevel \n"
" -graincount \n");
return 0;
}
int main(int argc, char **argv)
{
int jitter = MMSUPER8_DEFAULT_JITTER;
int flicker = MMSUPER8_DEFAULT_FLICKER;
int grain_level = MMSUPER8_DEFAULT_GRAIN_LEVEL;
int grain_count = -1;
fprintf(stderr, "%s\n", VERSION);
if (argc <= 1)
return print_syntax();
for (int argument = 1; argument < argc; ++argument)
if (strstr(argv[argument], "-flicker") && ((argument + 1) < argc))
{
++argument;
flicker = atoi(argv[argument]);
}
else if (strstr(argv[argument], "-jitter") && ((argument + 1) < argc))
{
++argument;
jitter = atoi(argv[argument]);
}
else if (strstr(argv[argument], "-graincount") && ((argument + 1) < argc))
{
++argument;
grain_count = atoi(argv[argument]);
}
else if (strstr(argv[argument], "-grainlevel") && ((argument + 1) < argc))
{
++argument;
grain_level = atoi(argv[argument]);
}
else if (!strstr(argv[argument], ".pnm") && !strstr(argv[argument], ".pgm"))
{
fprintf(stderr, "Invalid argument: %s\n", argv[argument]);
return print_syntax();
}
int frame_count = 0;
for (int argument = 1; argument < argc; ++argument)
if (strstr(argv[argument], ".pnm") || strstr(argv[argument], ".pgm"))
{
mmpnm_file file;
if (file.load(argv[argument]) >= 0)
{
fprintf(stderr, "%s: %d x %d\n", argv[argument],
file.width, file.height);
file.add_jitter(jitter);
file.add_grain(grain_level, grain_count);
file.add_flicker(flicker);
file.save(argv[argument]);
}
}
fprintf(stderr, "%d frames saved\n", frame_count);
return 0;
}
��������������������������������������������������������������������������������������������������������������������������������������������������������������������������������������������������������������������������������������������������������������������������������������������������������������������������������������������������������������������������������������������������������������������������������������������������������������������������������������mmsuper8/mmquicktime.h������������������������������������������������������������������������������0100644�0000764�0000764�00000034272�10066667374�015162� 0����������������������������������������������������������������������������������������������������ustar �michael�������������������������michael����������������������������������������������������������������������������������������������������������������������������������������������������������������������������������������������������������������/***************************************************************************
mmquicktime - Classes for creating Quicktime (.mov) files
-------------------
begin : 6/4/2004
copyright : (C) 2004 by Michael Minn
email : see www.michaelminn.com
-------------------
This program is free software; you can redistribute it and/or modify
it under the terms of version 2 of the GNU General Public License as
published by the Free Software Foundation.
***************************************************************************/
#ifndef MMQUICKTIME_H
#define MMQUICKTIME_H
#include
#include "mmpnm.h"
// Quicktime times are given in seconds since 1/1/1904.
// time() gives current time in seconds since 1/1/1970.
// This is the difference.
#define MMQUICKTIME_TIME_OFFSET_SECONDS 2082758400
#define MMQUICKTIME_DEFAULT_FPS 18
#define MMQUICKTIME_TIME_SCALE 18000
#define MMQUICKTIME_COLOR_MODE_RGB 0
#define MMQUICKTIME_COLOR_MODE_GRAY 1
unsigned int little_endian(unsigned char *big_endian_value);
unsigned int little_endian_short(unsigned char *big_endian_value);
int big_endian(unsigned int little_endian, unsigned char *big_endian);
int big_endian_short(unsigned int little_endian, unsigned char *big_endian);
int mmquicktime_list(char *filename);
char *mmquicktime_date_string(unsigned int quicktime_time);
class mmquicktime_container
{
public:
unsigned char atom_size[4];
unsigned char atom_name[4];
};
class mmquicktime_movie_header
{
public:
unsigned char atom_size[4];
unsigned char atom_name[4]; // mvhd
unsigned char version;
unsigned char flags[3];
unsigned char creation_time[4]; // Seconds since 1/1/1904
unsigned char modification_time[4];
unsigned char time_scale[4]; // Units per second
unsigned char duration[4];
unsigned char preferred_rate[4];
unsigned char preferred_volume[2];
unsigned char reserved[10];
unsigned char matrix[36];
unsigned char preview_time[4];
unsigned char preview_duration[4];
unsigned char poster_time[4];
unsigned char selection_time[4];
unsigned char selection_duration[4];
unsigned char current_time[4];
unsigned char next_track_id[4];
void list()
{
printf(" Time scale: %d\n", little_endian(time_scale));
printf(" Duration: %d (%d sec)\n", little_endian(duration),
little_endian(duration) / little_endian(time_scale));
printf(" Preferred rate: %f\n", little_endian(preferred_rate) / 65536.0);
printf(" Preferred volume: %d\n", little_endian_short(preferred_volume));
printf(" Matrix: %f %f %f\n",
little_endian(&matrix[0]) / 65536.0,
little_endian(&matrix[4]) / 65536.0,
little_endian(&matrix[8]) / 65536.0);
printf(" %f %f %f\n",
little_endian(&matrix[12]) / 65536.0,
little_endian(&matrix[16]) / 65536.0,
little_endian(&matrix[20]) / 65536.0);
printf(" %f %f %f\n",
little_endian(&matrix[24]) / 65536.0,
little_endian(&matrix[28]) / 65536.0,
little_endian(&matrix[32]) / 65536.0);
printf(" Preview time %d\n", little_endian(preview_time));
printf(" Preview duration %d\n", little_endian(preview_duration));
printf(" Poster time %d\n", little_endian(poster_time));
printf(" Selection time %d\n", little_endian(selection_time));
printf(" Selection duration %d\n", little_endian(selection_duration));
printf(" Current time %d\n", little_endian(current_time));
printf(" Next track ID %d\n", little_endian(next_track_id));
}
};
class mmquicktime_track_header
{
public:
unsigned char atom_size[4];
unsigned char atom_name[4]; // tkhd
unsigned char version;
unsigned char flags[3];
unsigned char creation_time[4];
unsigned char modification_time[4];
unsigned char track_id[4];
unsigned char reserved[4];
unsigned char duration[4];
unsigned char reserved2[8];
unsigned char layer[2];
unsigned char alternate_group[2];
unsigned char volume[2];
unsigned char reserved3[2];
unsigned char matrix[36];
unsigned char track_width[4]; // fixed-point: 16-bits whole, 16-bit fractional?
unsigned char track_height[4]; // fixed-point
void list()
{
printf(" Creation time %u (%s)\n", (unsigned int) little_endian(creation_time),
mmquicktime_date_string((unsigned int) little_endian(creation_time)));
printf(" Modification time %u (%s)\n", (unsigned int) little_endian(modification_time),
mmquicktime_date_string((unsigned int) little_endian(modification_time)));
printf(" Track %d\n", little_endian(track_id));
printf(" Duration %d\n", little_endian(duration));
printf(" Layer %d\n", little_endian_short(layer));
printf(" Alternate Group %d\n", little_endian_short(alternate_group));
printf(" Layer %02x%02x\n", layer[0], layer[1]);
printf(" Alternate Group %02x%02x\n", alternate_group[0], alternate_group[1]);
printf(" Volume %02x%02x\n", volume[0], volume[1]);
printf(" %f x %f\n", little_endian(track_width) / 65536.0,
little_endian(track_height) / 65536.0);
}
};
class mmquicktime_edit_list_entry
{
public:
unsigned char track_duration[4];
unsigned char starting_time[4];
unsigned char media_rate[4];
};
class mmquicktime_edit_list
{
public:
unsigned char atom_size[4];
unsigned char atom_name[4]; // elst
unsigned char version;
unsigned char flags[3];
unsigned char entry_count[4];
mmquicktime_edit_list_entry entries[];
};
class mmquicktime_media_header
{
public:
unsigned char atom_size[4];
unsigned char atom_name[4]; // mdhd
unsigned char version;
unsigned char flags[3];
unsigned char creation_time[4];
unsigned char modification_time[4];
unsigned char time_scale[4];
unsigned char duration[4];
unsigned char language[2];
unsigned char quality[2];
void list()
{
printf(" Time scale: %d\n", little_endian(time_scale));
printf(" Duration: %d (%d seconds)\n", little_endian(duration),
little_endian(duration) / little_endian(time_scale));
printf(" Language: %02x%02x\n", language[0], language[1]);
printf(" Quality: %02x%02x\n", quality[0], quality[1]);
}
};
class mmquicktime_media_handler_reference
{
public:
unsigned char atom_size[4];
unsigned char atom_name[4]; // hdlr
unsigned char version;
unsigned char flags[3];
unsigned char component_type[4]; // mhlr = media, dhlr = data
unsigned char component_subtype[4]; // vide = video, soun = sound
unsigned char component_manufacturer[4]; // usually appl (Apple)
unsigned char component_flags[4];
unsigned char component_flag_mask[4];
char component_name[];
void list()
{
printf(" Handler type %.4s, subtype %.4s, manufacturer %.4s\n",
component_type, component_subtype, component_manufacturer);
printf(" Flags %02x%02x%02x%02x\n",
component_flags[0], component_flags[1], component_flags[2], component_flags[3]);
printf(" Flag Mask %02x%02x%02x%02x\n",
component_flag_mask[0], component_flag_mask[1],
component_flag_mask[2], component_flag_mask[3]);
printf(" %.*s\n",
little_endian(atom_size) - 28, component_name);
}
};
class mmquicktime_video_media_information
{
public:
unsigned char atom_size[4];
unsigned char atom_name[4]; // vmhd
unsigned char version;
unsigned char flags[3];
unsigned char graphics_mode[2];
unsigned char transfer_mode_red[2];
unsigned char transfer_mode_green[2];
unsigned char transfer_mode_blue[2];
void list()
{
printf(" Graphics mode %02x%02x\n", graphics_mode[0], graphics_mode[1]);
printf(" Transfer mode R=%02x%02x G=%02x%02x B=%02x%02x\n",
transfer_mode_red[0], transfer_mode_red[1],
transfer_mode_green[0], transfer_mode_green[1],
transfer_mode_blue[0], transfer_mode_blue[1]);
}
};
class mmquicktime_sound_media_information
{
public:
unsigned char atom_size[4];
unsigned char atom_name[4]; // smhd
unsigned char version;
unsigned char flags[3];
unsigned char balance[2];
unsigned char reserved[2];
};
class mmquicktime_data_reference_entry
{
public:
unsigned char atom_size[4];
unsigned char atom_name[4]; // Data type: alis or rsrc
unsigned char version;
unsigned char flags[3];
unsigned char data[];
};
class mmquicktime_data_reference
{
public:
unsigned char atom_size[4];
unsigned char atom_name[4]; // dref
unsigned char version;
unsigned char flags[3];
unsigned char entry_count[4];
unsigned char data[]; // mmquicktime_data_reference_entry
void list()
{
int size = little_endian(atom_size) - 16;
printf(" %d data references (%d bytes)\n", little_endian(entry_count), size);
/**
unsigned char *scan = data;
while (scan < &data[size])
{
printf(" %.4s\n", &scan[4]);
scan += little_endian(scan);
}
**/
}
};
class mmquicktime_color_table
{
public:
//unsigned char atom_size[4];
//unsigned char atom_name[4]; // ctab
unsigned char seed[4];
unsigned char flags[2];
unsigned char entry_count[2];
unsigned char entries[2048]; // 256 entries, each with four 16-bit integers: ARGB
void list()
{
printf(" %d color table entries\n", little_endian_short(entry_count) + 1);
printf(" Seed %x\n", little_endian(seed));
}
};
// From "Inside Macintosh: Quicktime" pp 3-448
class mmquicktime_sample_description_entry
{
public:
unsigned char atom_size[4];
unsigned char atom_name[4];
unsigned char reserved[6];
unsigned char reference_index[2];
unsigned char version[2];
unsigned char revision_level[2];
unsigned char vendor[4];
unsigned char temporal_quality[4];
unsigned char spacial_quality[4];
unsigned char width[2];
unsigned char height[2];
unsigned char horizontal_resolution[4]; // fixed point
unsigned char vertical_resolution[4]; // fixed point
unsigned char data_byte_size[4];
unsigned char frame_count[2];
unsigned char compression_algorithm_name[32];
unsigned char pixel_depth[2];
unsigned char color_table_id[2];
unsigned char color_table[]; // only present if color_table_id == 0
void list()
{
printf(" Sample description: %.4s\n", atom_name);
printf(" Index: %d\n", little_endian_short(reference_index));
printf(" Version: %d\n", little_endian_short(version));
printf(" Revision level: %d\n", little_endian_short(revision_level));
printf(" Vendor: %.4s\n", vendor);
printf(" Temporal quality: %x\n", little_endian(temporal_quality));
printf(" Spacial quality: %x\n", little_endian(spacial_quality));
printf(" Dimensions: %d x %d\n", little_endian_short(width), little_endian_short(height));
printf(" Resolution: %f x %f\n",
little_endian(horizontal_resolution) / 65536.0,
little_endian(vertical_resolution) / 65536.0);
printf(" Data bytes: %d\n", little_endian(data_byte_size));
printf(" Frame count: %d\n", little_endian_short(frame_count));
printf(" Algorithm: %.32s\n", compression_algorithm_name);
printf(" Pixel depth: %d\n", little_endian_short(pixel_depth));
printf(" Color table ID: %d\n", little_endian_short(color_table_id));
if (little_endian_short(color_table_id) == 0)
((mmquicktime_color_table*)color_table)->list();
}
};
class mmquicktime_sample_description
{
public:
unsigned char atom_size[4];
unsigned char atom_name[4]; // stsd
unsigned char version;
unsigned char flags[3];
unsigned char entry_count[4];
unsigned char entries[];
void list()
{
printf(" %d sample descriptions\n", little_endian(entry_count));
for (int scan = 0, end = little_endian(atom_size) - 16; scan < end;
scan += little_endian(&entries[scan]))
((mmquicktime_sample_description_entry*) &entries[scan])->list();
}
};
class mmquicktime_time_to_sample_table
{
public:
unsigned char atom_size[4];
unsigned char atom_name[4]; // stts
unsigned char version;
unsigned char flags[3];
unsigned char entry_count[4];
unsigned char entries[];
void list()
{
printf(" %d time-to-sample entries\n", little_endian(entry_count));
for (unsigned int entry = 0; entry < little_endian(entry_count); ++entry)
printf(" %d samples, duration %d\n", little_endian(&entries[entry * 8]),
little_endian(&entries[(entry * 8) + 4]));
}
};
class mmquicktime_keyframe_table // AKA sync sample atom
{
public:
unsigned char atom_size[4];
unsigned char atom_name[4]; // stss
unsigned char version;
unsigned char flags[3];
unsigned char entry_count[4];
unsigned char entries[];
void list()
{
for (unsigned int entry = 0; entry < little_endian(entry_count); ++entry)
printf(" Keyframe %d\n", little_endian(&entries[entry * 4]));
}
};
class mmquicktime_chunk_table // AKA Sample-to-chunk
{
public:
unsigned char atom_size[4];
unsigned char atom_name[4]; // stsc
unsigned char version;
unsigned char flags[3];
unsigned char entry_count[4];
unsigned char entries[];
void list()
{
for (unsigned int entry = 0; entry < little_endian(entry_count); ++entry)
printf(" First chunk %d, samples per chunk %d, description %x\n",
little_endian(&entries[entry * 12]),
little_endian(&entries[(entry * 12) + 4]),
little_endian(&entries[(entry * 12) + 8]));
}
};
class mmquicktime_sample_size_table
{
public:
unsigned char atom_size[4];
unsigned char atom_name[4]; // stsz
unsigned char version;
unsigned char flags[3];
unsigned char sample_size[4]; // if 0, all samples have table entry; else this is size
unsigned char entry_count[4];
unsigned char entries[];
void list()
{
printf(" Fixed sample size %d\n", little_endian(sample_size));
printf(" %d sample size entries\n", little_endian(entry_count));
for (unsigned int entry = 0; (entry < 10) && (entry < little_endian(entry_count)); ++entry)
printf(" Sample %d: %d bytes\n", entry, little_endian(&entries[entry * 4]));
}
};
class mmquicktime_sample_offset_table
{
public:
unsigned char atom_size[4];
unsigned char atom_name[4]; // stco
unsigned char version;
unsigned char flags[3];
unsigned char entry_count[4];
unsigned char entries[];
void list()
{
printf(" %d chunk offset table entries\n", little_endian(entry_count));
for (unsigned int entry = 0; (entry < 10) && (entry < little_endian(entry_count)); ++entry)
printf(" Chunk %d @ %d\n", entry, little_endian(&entries[entry * 4]));
}
};
class mmquicktime_file
{
public:
mmquicktime_file() { memset(this, 0, sizeof(*this)); descriptor = -1; }
int open_file(char *filename, int color_mode, int frames_per_second);
int add_frame(mmpnm_file *frame);
int close_file();
private:
int color_mode;
int descriptor;
int frame_count;
int frame_width;
int frame_height;
int frames_per_second;
};
#endif
��������������������������������������������������������������������������������������������������������������������������������������������������������������������������������������������������������������������������������������������������������������������������������������������������������������������������������������mmsuper8/mmpnm.h������������������������������������������������������������������������������������0100644�0000764�0000764�00000005620�10172274762�013745� 0����������������������������������������������������������������������������������������������������ustar �michael�������������������������michael����������������������������������������������������������������������������������������������������������������������������������������������������������������������������������������������������������������/***************************************************************************
mmpnm - Utilities for loading PNM (Portable Anymap) files
-------------------
begin : 6/4/2004
copyright : (C) 2004 by Michael Minn
email : see www.michaelminn.com
-------------------
This program is free software; you can redistribute it and/or modify
it under the terms of version 2 of the GNU General Public License as
published by the Free Software Foundation.
***************************************************************************/
#ifndef MMPNM_H
#define MMPNM_H
#include
#include
#include
/************************************************************************
Parameters for separating frames
************************************************************************/
#define FILM_WIDTH_1200_DPI 377
#define FRAME_HEIGHT_1200_DPI 200
#define FRAME_WIDTH_1200_DPI 276
#define SPROCKET_HEIGHT_1200_DPI 54
#define SPROCKET_WIDTH_1200_DPI 43
#define SPROCKET_AREA_WIDTH_1200_DPI 70
#define SOUND_AREA_WIDTH_1200_DPI 30
#define SPROCKET_TO_EDGE_1200_DPI 24
class mmpnm_framing
{
public:
int resolution_dpi;
int film_width;
int frame_width;
int frame_offset;
int sprocket_height;
int sprocket_width;
int sprocket_to_edge;
int sprocket_area_width;
int clip_top;
int clip_bottom;
int clip_left;
int clip_right;
int ignore_sprocket_holes;
int frame_from_right;
float frame_height;
mmpnm_framing() { set_resolution(1200); }
int set_resolution(int new_resolution);
};
class mmpnm_file
{
public:
int width;
int height;
unsigned char *color_data; // always 24-bit RGB
unsigned char *gray_data; // always 8-bit grayscale
mmpnm_file *next; // for linked list of files/frames
mmpnm_file() { memset(this, 0, sizeof(*this)); }
~mmpnm_file();
int add_flicker(int flicker_level);
int add_grain(int grain_level, int grain_count);
int add_jitter(float max_jitter);
int add_noise(int max_noise);
int add_pixel(int level, int x, int y, int color);
int add_point(int level, float x, float y, int color);
int add_to_list(mmpnm_file *&list);
int adjust_color(int color, int low_value, int high_value);
int adjust_midpoint(int color, int midpoint); // color=3 for gray
int clear();
int convert_to_frames(mmpnm_file *&frames, mmpnm_framing ¶meters);
int copy(mmpnm_file *source);
int copy_frame(mmpnm_file *source, int frame_width, int frame_height, int left_x, int top_y);
int crop(int new_width, int new_height);
int delete_list();
int find_average_luminance(int color); // color=3 for gray
int load(char *filename);
int normalize_gray();
int normalize_color(int color);
int save(char *file_name);
int save_frames_to_separate_files(int is_black_and_white, int starting_frame_number);
int shift(int x_shift, int y_shift);
int shift(float x_shift, float y_shift);
};
#endif
����������������������������������������������������������������������������������������������������������������mmsuper8/mmquicktime.cpp����������������������������������������������������������������������������0100644�0000764�0000764�00000053753�10157430637�015511� 0����������������������������������������������������������������������������������������������������ustar �michael�������������������������michael����������������������������������������������������������������������������������������������������������������������������������������������������������������������������������������������������������������/***************************************************************************
mmquicktime - Classes for creating Quicktime (.mov) files
-------------------
begin : 6/4/2004
copyright : (C) 2004 by Michael Minn
email : see www.michaelminn.com
-------------------
This program is free software; you can redistribute it and/or modify
it under the terms of version 2 of the GNU General Public License as
published by the Free Software Foundation.
Y = (0.299 * r) + (0.587 * g) + (0.114 * b)
Cr = U = (r - y) / 1.402
Cb = V = (b - y) / 1.772
r = y + (1.402 * u)
g = y - (0.344 * v) - (0.714 * u)
b = y + (1.772 * v)
// Apple
r = 1.402 * v + y + 0.5
g = y - (0.7143 * v) - (0.3437 * u) + .5
b = (1.77 * u) + y + .5
***************************************************************************/
//#include
//#include
//#include
#include
#include
//#include
#include
#include
#include
#include
#include "mmquicktime.h"
unsigned int little_endian(unsigned char *big_endian_value)
{
return (((unsigned int) big_endian_value[0]) << 24)
+ (((unsigned int) big_endian_value[1]) << 16)
+ (((unsigned int) big_endian_value[2]) << 8)
+ ((unsigned int) big_endian_value[3]);
}
unsigned int little_endian_short(unsigned char *big_endian_value)
{
short value = (((short) big_endian_value[0]) << 8) + ((short) big_endian_value[1]);
return value;
}
int big_endian(unsigned int little_endian, unsigned char *big_endian)
{
big_endian[0] = (little_endian >> 24) & 0xff;
big_endian[1] = (little_endian >> 16) & 0xff;
big_endian[2] = (little_endian >> 8) & 0xff;
big_endian[3] = little_endian & 0xff;
return *((int*) big_endian);
}
int big_endian_short(unsigned int little_endian, unsigned char *big_endian)
{
big_endian[0] = (little_endian >> 8) & 0xff;
big_endian[1] = little_endian & 0xff;
return *((int*) big_endian);
}
int mmquicktime_list(char *filename)
{
int descriptor = -1;
unsigned char *buffer;
struct stat file_info;
if ((descriptor = open(filename, O_RDONLY)) < 0)
perror(filename);
else if (fstat(descriptor, &file_info) < 0)
perror(filename);
else if ((buffer = new unsigned char[file_info.st_size]) == NULL)
perror("Buffer allocation failure");
else if (read(descriptor, buffer, file_info.st_size) < 0)
perror(filename);
else
{
unsigned char *scan = buffer;
while (scan < &buffer[file_info.st_size])
{
//int is_container = 0;
char *atom_name = (char*) &scan[4];
unsigned int atom_size = little_endian(scan);
unsigned int actual_size = atom_size;
if ((strncmp(atom_name, "dref", 4) == 0) || (strncmp(atom_name, "stsd", 4) == 0))
actual_size = 16; // entries in data ref & sample desc table are atoms
if (atom_size == 1) // strange kludge for file created with libquicktime
actual_size = little_endian(&scan[12]);
if ((strncmp(atom_name, "moov", 4) == 0)
|| (strncmp(atom_name, "trak", 4) == 0)
|| (strncmp(atom_name, "mdia", 4) == 0)
|| (strncmp(atom_name, "clip", 4) == 0)
|| (strncmp(atom_name, "matt", 4) == 0)
|| (strncmp(atom_name, "edts", 4) == 0)
|| (strncmp(atom_name, "dinf", 4) == 0)
|| (strncmp(atom_name, "minf", 4) == 0)
|| (strncmp(atom_name, "udta", 4) == 0)
|| (strncmp(atom_name, "stbl", 4) == 0))
actual_size = 8;
// is_container = 1;
// dinf atom names start with a9
if (actual_size == 8) // container
printf("Atom %.4s = %d bytes @ %x\n",
atom_name, atom_size, scan - buffer);
else
printf(" Atom %.4s = %d (%d) bytes @ %x, version %x, flags %02x%02x%02x\n",
atom_name, atom_size, actual_size, scan - buffer,
scan[8], scan[9], scan[10], scan[11]);
if (strncmp(atom_name, "tkhd", 4) == 0)
((mmquicktime_track_header*) scan)->list();
else if (strncmp(atom_name, "mvhd", 4) == 0)
((mmquicktime_movie_header*) scan)->list();
else if (strncmp(atom_name, "mdhd", 4) == 0)
((mmquicktime_media_header*) scan)->list();
else if (strncmp(atom_name, "hdlr", 4) == 0)
((mmquicktime_media_handler_reference*) scan)->list();
else if (strncmp(atom_name, "vmhd", 4) == 0)
((mmquicktime_video_media_information*) scan)->list();
else if (strncmp(atom_name, "dref", 4) == 0)
((mmquicktime_data_reference*) scan)->list();
else if (strncmp(atom_name, "stsd", 4) == 0)
((mmquicktime_sample_description*) scan)->list();
else if (strncmp(atom_name, "stts", 4) == 0)
((mmquicktime_time_to_sample_table*) scan)->list();
else if (strncmp(atom_name, "stss", 4) == 0)
((mmquicktime_keyframe_table*) scan)->list();
else if (strncmp(atom_name, "stsc", 4) == 0)
((mmquicktime_chunk_table*) scan)->list();
else if (strncmp(atom_name, "stsz", 4) == 0)
((mmquicktime_sample_size_table*) scan)->list();
else if (strncmp(atom_name, "stco", 4) == 0)
((mmquicktime_sample_offset_table*) scan)->list();
else if (strncmp(atom_name, "ctab", 4) == 0)
((mmquicktime_color_table*) scan)->list();
if (actual_size <= 0)
scan = &buffer[file_info.st_size];
else
scan += actual_size;
}
}
if (descriptor >= 0)
close(descriptor);
if (buffer)
delete buffer;
return 0;
}
char *mmquicktime_date_string(unsigned int quicktime_time)
{
// quicktime_time is seconds since 1/1/1904
int four_year = quicktime_time / 126230400;
int four_year_seconds = quicktime_time % 126230400;
int year = 1904 + (4 * four_year);
int year_seconds = four_year_seconds;
if (four_year_seconds >= 31622400)
{
year += (1 + ((four_year_seconds - 31622400) / 31536000));
year_seconds = ((four_year_seconds - 31622400) % 31536000);
}
int year_day = year_seconds / (24 * 60 * 60);
int hour = (year_seconds % (24 * 60 * 60)) / (60 * 60);
int minute = (year_seconds % (60 * 60)) / 60;
int day = 0;
int month = 0;
int month_length[12] = { 31, 28, 31, 30, 31, 30, 31, 31, 30, 31, 30, 31 };
for (int scan = 0, sum = 0; sum < year_day; ++scan)
{
int length = month_length[scan];
if ((month == 1) && ((year % 4) == 0)) // leap year
++length;
if ((sum < year_day) && (year_day < (sum + length)))
{
month = scan + 1;
day = year_day - sum + 1;
}
sum += length;
}
static char date_string[32];
sprintf(date_string, "%02d/%02d/%04d %02d:%02d", month, day, year, hour, minute);
return date_string;
}
/*********************************************************/
int mmquicktime_file::open_file(char *filename, int color_mode, int frames_per_second)
{
if (!this)
return -EINVAL;
if (frames_per_second <= 0)
{
fprintf(stderr, "Invalid frames per second value %d\n", frames_per_second);
return -EINVAL;
}
memset(this, 0, sizeof(*this));
this->color_mode = color_mode;
this->frames_per_second = frames_per_second;
if ((descriptor = open(filename, O_WRONLY | O_CREAT | O_TRUNC, 0664)) < 0)
{
int status = -errno;
perror(filename);
return status;
}
unsigned char header[16] = { 0, 0, 0, 0, 'm', 'd', 'a', 't' };
if (write(descriptor, header, 8) < 0)
{
int status = -errno;
perror(filename);
close(descriptor);
descriptor = -1;
return status;
}
return descriptor;
}
int mmquicktime_file::add_frame(mmpnm_file *frame)
{
if (!this || (descriptor < 0))
return -EINVAL;
if (!frame_width || !frame_height)
{
frame_width = frame->width;
frame_height = frame->height;
}
else if ((frame_width != frame->width) || (frame_height != frame->height))
{
fprintf(stderr, "Cropping %d x %d frame to %d x %d\n",
frame->width, frame->height, frame_width, frame_height);
frame->crop(frame_width, frame_height);
}
int length = frame_width * frame_height * 3;
unsigned char *data = frame->color_data;
if (color_mode == MMQUICKTIME_COLOR_MODE_GRAY)
{
data = frame->gray_data;
length = frame_width * frame_height;
}
if (write(descriptor, data, length) < 0)
{
int status = -errno;
perror("Failure writing frame data");
return status;
}
++frame_count;
return length;
}
int mmquicktime_file::close_file()
{
int length_sum = 0;
unsigned int creation_time = MMQUICKTIME_TIME_OFFSET_SECONDS + time(NULL);
unsigned char default_matrix[36] =
{ 0, 1, 0, 0, 0, 0, 0, 0, 0, 0, 0, 0,
0, 0, 0, 0, 0, 1, 0, 0, 0, 0, 0, 0,
0, 0, 0, 0, 0, 0, 0, 0, 0x40, 0, 0, 0 };
// Find length of movie data
struct stat file_info;
if (fstat(descriptor, &file_info) < 0)
{
int status = -errno;
perror("Failure finding movie data length");
return status;
}
int movie_data_length = file_info.st_size;
int time_per_frame = MMQUICKTIME_TIME_SCALE / frames_per_second;
int duration = frame_count * time_per_frame;
int frame_size = frame_width * frame_height * 3;
if (color_mode == MMQUICKTIME_COLOR_MODE_GRAY)
frame_size = frame_width * frame_height;
// Create movie information atoms at end of file
mmquicktime_container movie_container;
memcpy(movie_container.atom_name, "moov", 4);
length_sum += 8;
mmquicktime_movie_header movie_header;
memset(&movie_header, 0, sizeof(movie_header));
big_endian(sizeof(movie_header), movie_header.atom_size);
big_endian(duration, movie_header.duration);
memcpy(movie_header.atom_name, "mvhd", 4);
movie_header.version = 0;
big_endian(creation_time, movie_header.creation_time);
big_endian(creation_time, movie_header.modification_time);
big_endian(MMQUICKTIME_TIME_SCALE, movie_header.time_scale);
movie_header.preferred_rate[1] = 1;
memset(movie_header.preferred_volume, 0, 2);
memcpy(movie_header.matrix, default_matrix, 36);
movie_header.next_track_id[3] = 2;
length_sum += sizeof(movie_header);
mmquicktime_container track_container;
memcpy(track_container.atom_name, "trak", 4);
int track_container_start = length_sum;
length_sum += 8;
mmquicktime_track_header track_header;
memset(&track_header, 0, sizeof(track_header));
big_endian(sizeof(track_header), track_header.atom_size);
big_endian(duration, track_header.duration);
memcpy(track_header.atom_name, "tkhd", 4);
track_header.flags[2] = 0x0f; // enabled - [3] here caused no display
big_endian(creation_time, track_header.creation_time);
big_endian(creation_time, track_header.modification_time);
big_endian(1, track_header.track_id);
memcpy(track_header.matrix, default_matrix, 36);
big_endian(frame_width << 16, track_header.track_width);
big_endian(frame_height << 16, track_header.track_height);
length_sum += sizeof(track_header);
mmquicktime_container media_container;
memcpy(media_container.atom_name, "mdia", 4);
int media_container_start = length_sum;
length_sum += 8;
mmquicktime_media_header media_header;
memset(&media_header, 0, sizeof(media_header));
big_endian(sizeof(media_header), media_header.atom_size);
big_endian(duration, media_header.duration);
memcpy(media_header.atom_name, "mdhd", 4);
big_endian(creation_time, media_header.creation_time);
big_endian(creation_time, media_header.modification_time);
big_endian(MMQUICKTIME_TIME_SCALE, media_header.time_scale);
length_sum += sizeof(media_header);
mmquicktime_media_handler_reference video_media_handler;
memset(&video_media_handler, 0, sizeof(video_media_handler));
big_endian(sizeof(video_media_handler), video_media_handler.atom_size);
memcpy(video_media_handler.atom_name, "hdlr", 4);
memcpy(video_media_handler.component_type, "mhlr", 4);
memcpy(video_media_handler.component_subtype, "vide", 4);
length_sum += sizeof(video_media_handler);
/**
memcpy(video_media_handler.component_manufacturer, "appl", 4);
char *video_handler_name = "Apple Video Media Handler";
int video_handler_length = sizeof(video_media_handler)
+ strlen(video_handler_name) + 1;
big_endian(video_handler_length, video_media_handler.atom_size);
length_sum += video_handler_length;
**/
mmquicktime_container media_information_container;
memcpy(media_information_container.atom_name, "minf", 4);
int media_information_container_start = length_sum;
length_sum += 8;
mmquicktime_video_media_information video_media_information;
memset(&video_media_information, 0,
sizeof(video_media_information));
big_endian(sizeof(video_media_information),
video_media_information.atom_size);
memcpy(video_media_information.atom_name, "vmhd", 4);
video_media_information.flags[2] = 1;
video_media_information.graphics_mode[0] = 0;
video_media_information.graphics_mode[1] = 0x40;
video_media_information.transfer_mode_red[0] = 0x80;
video_media_information.transfer_mode_green[0] = 0x80;
video_media_information.transfer_mode_blue[0] = 0x80;
length_sum += sizeof(video_media_information);
mmquicktime_media_handler_reference video_alias_handler;
memset(&video_alias_handler, 0, sizeof(video_alias_handler));
big_endian(sizeof(video_alias_handler),
video_alias_handler.atom_size);
memcpy(video_alias_handler.atom_name, "hdlr", 4);
memcpy(video_alias_handler.component_type, "dhlr", 4);
memcpy(video_alias_handler.component_subtype, "alis", 4);
length_sum += sizeof(video_alias_handler);
/**
memcpy(video_alias_handler.component_manufacturer, "appl", 4);
char *alias_handler_name = "Apple Alias Data Handler";
int alias_handler_length = sizeof(video_media_handler)
+ strlen(alias_handler_name) + 1;
big_endian(alias_handler_length, video_alias_handler.atom_size);
length_sum += alias_handler_length;
**/
mmquicktime_container data_reference_container;
memcpy(data_reference_container.atom_name, "dinf", 4);
int data_reference_container_start = length_sum;
length_sum += 8;
mmquicktime_data_reference data_reference;
memset(&data_reference, 0, sizeof(data_reference));
big_endian(28, data_reference.atom_size);
memcpy(data_reference.atom_name, "dref", 4);
big_endian(1, data_reference.entry_count);
length_sum += sizeof(data_reference);
mmquicktime_data_reference_entry data_reference_entry;
memset(&data_reference_entry, 0,
sizeof(data_reference_entry));
memcpy(data_reference_entry.atom_name, "alis", 4);
big_endian(12, data_reference_entry.atom_size);
data_reference_entry.flags[2] = 1;
length_sum += sizeof(data_reference_entry);
big_endian(length_sum - data_reference_container_start,
data_reference_container.atom_size);
mmquicktime_container sample_table;
memcpy(sample_table.atom_name, "stbl", 4);
int sample_table_start = length_sum;
length_sum += 8;
mmquicktime_sample_description sample_description;
memset(&sample_description, 0, sizeof(sample_description));
memcpy(sample_description.atom_name, "stsd", 4);
big_endian(16 + sizeof(mmquicktime_sample_description_entry),
sample_description.atom_size);
big_endian(1, sample_description.entry_count);
length_sum += sizeof(sample_description);
mmquicktime_sample_description_entry sample_description_entry;
memset(&sample_description_entry, 0,
sizeof(sample_description_entry));
big_endian(sizeof(sample_description_entry),
sample_description_entry.atom_size);
memcpy(sample_description_entry.atom_name, "raw ", 4);
big_endian_short(24, sample_description_entry.pixel_depth);
strcpy((char*)sample_description_entry.compression_algorithm_name,
"\x10Uncompressed RGB");
if (color_mode == MMQUICKTIME_COLOR_MODE_GRAY)
{
memcpy(sample_description_entry.atom_name, "raw ", 4);
big_endian_short(8, sample_description_entry.pixel_depth);
}
sample_description_entry.reference_index[1] = 1;
// Max quality: from Inside Macintosh: Quicktime pp 3-455
big_endian(0x3ff, sample_description_entry.temporal_quality);
big_endian(0x3ff, sample_description_entry.spacial_quality);
big_endian_short(frame_width,
sample_description_entry.width);
big_endian_short(frame_height,
sample_description_entry.height);
big_endian(72 << 16,
sample_description_entry.horizontal_resolution);
big_endian(72 << 16,
sample_description_entry.vertical_resolution);
big_endian_short(1, sample_description_entry.frame_count);
memset(sample_description_entry.color_table_id, 0xff, 2);
length_sum += sizeof(sample_description_entry);
mmquicktime_color_table color_table;
if (color_mode == MMQUICKTIME_COLOR_MODE_GRAY)
{
big_endian(sizeof(sample_description)
+ sizeof(sample_description_entry)
+ sizeof(color_table),
sample_description.atom_size);
big_endian(sizeof(sample_description_entry)
+ sizeof(color_table),
sample_description_entry.atom_size);
big_endian_short(8, sample_description_entry.pixel_depth);
sample_description_entry.color_table_id[0] = 0;
sample_description_entry.color_table_id[1] = 0;
memset(&color_table, 0, sizeof(color_table));
color_table.flags[0] = 0x80;
color_table.entry_count[1] = 0xff;
length_sum += sizeof(color_table);
for (int init = 0; init < 256; ++init)
{
int index = init * 8;
color_table.entries[index + 2] = init;
//color_table.entries[index + 4] = init;
//color_table.entries[index + 6] = init;
}
}
mmquicktime_time_to_sample_table time_to_sample_table;
memset(&time_to_sample_table, 0, sizeof(time_to_sample_table));
big_endian(24, time_to_sample_table.atom_size);
memcpy(time_to_sample_table.atom_name, "stts", 4);
time_to_sample_table.entry_count[3] = 1;
length_sum += 16;
// Sample durations array
unsigned char sample_durations[8];
big_endian(frame_count, sample_durations);
big_endian(time_per_frame, &sample_durations[4]);
length_sum += 8;
/**
mmquicktime_keyframe_table keyframe_table; // sync sample atom
memset(&keyframe_table, 0, sizeof(keyframe_table));
memcpy(keyframe_table.atom_name, "stss", 4);
keyframe_table.entry_count[3] = 1;
keyframe_table.atom_size[3] = 20;
char keyframe_list[4] = { 0, 0, 0, 1 };
length_sum += 20;
**/
mmquicktime_chunk_table chunk_table; // AKA Sample-to-chunk
memset(&chunk_table, 0, sizeof(chunk_table));
memcpy(chunk_table.atom_name, "stsc", 4);
chunk_table.entry_count[3] = 1;
chunk_table.atom_size[3] = 28;
char chunk_list[12] = { 0, 0, 0, 1, 0, 0, 0, 1, 0, 0, 0, 1 };
mmquicktime_sample_size_table sample_size_table;
memset(&sample_size_table, 0, sizeof(sample_size_table));
memcpy(sample_size_table.atom_name, "stsz", 4);
big_endian(20, sample_size_table.atom_size);
big_endian(frame_size, sample_size_table.sample_size);
length_sum += 20;
/***
unsigned char sample_size_entries[frame_count * 4];
for (int init = 0; init < frame_count; ++init)
big_endian(frame_width * frame_height * colors,
&sample_size_entries[init * 4]);
length_sum += (frame_count * 4);
big_endian(20 + (frame_count * 4), sample_size_table.atom_size);
big_endian(frame_count, sample_size_table.entry_count);
***/
mmquicktime_sample_offset_table sample_offset_table;
memset(&sample_offset_table, 0, sizeof(sample_offset_table));
memcpy(sample_offset_table.atom_name, "stco", 4);
big_endian(frame_count, sample_offset_table.entry_count);
unsigned char sample_offsets[4 * frame_count];
for (int frame = 0, offset = 8; frame < frame_count;
++frame, offset += frame_size)
big_endian(offset, &sample_offsets[frame << 2]);
int offset_table_length = 16 + (4 * frame_count);
big_endian(offset_table_length, sample_offset_table.atom_size);
length_sum += offset_table_length;
big_endian(length_sum - sample_table_start, sample_table.atom_size);
big_endian(length_sum - media_information_container_start,
media_information_container.atom_size);
big_endian(length_sum - media_container_start, media_container.atom_size);
big_endian(length_sum - track_container_start, track_container.atom_size);
big_endian(length_sum, movie_container.atom_size);
// Write to file
write(descriptor, &movie_container, 8);
write(descriptor, &movie_header, little_endian(movie_header.atom_size));
write(descriptor, &track_container, 8);
write(descriptor, &track_header, little_endian(track_header.atom_size));
write(descriptor, &media_container, 8);
write(descriptor, &media_header, little_endian(media_header.atom_size));
write(descriptor, &video_media_handler, sizeof(video_media_handler));
// write(descriptor, video_handler_name, strlen(video_handler_name) + 1);
write(descriptor, &media_information_container, 8);
write(descriptor, &video_media_information, little_endian(video_media_information.atom_size));
write(descriptor, &video_alias_handler, sizeof(video_alias_handler));
// write(descriptor, alias_handler_name, strlen(alias_handler_name) + 1);
write(descriptor, &data_reference_container, 8);
write(descriptor, &data_reference, 16);
write(descriptor, &data_reference_entry, little_endian(data_reference_entry.atom_size));
write(descriptor, &sample_table, 8);
write(descriptor, &sample_description, sizeof(sample_description));
write(descriptor, &sample_description_entry, sizeof(sample_description_entry));
if (color_mode == MMQUICKTIME_COLOR_MODE_GRAY)
write(descriptor, &color_table, sizeof(color_table));
write(descriptor, &time_to_sample_table, 16);
write(descriptor, sample_durations, 8);
//write(descriptor, &keyframe_table, 16);
//write(descriptor, keyframe_list, 4);
write(descriptor, &chunk_table, 16);
write(descriptor, chunk_list, 12);
write(descriptor, &sample_size_table, 20);
write(descriptor, &sample_offset_table, 16);
write(descriptor, sample_offsets, 4 * frame_count);
// Write movie data length
unsigned char big_endian_length[4];
big_endian(movie_data_length, big_endian_length);
lseek(descriptor, 0, SEEK_SET);
write(descriptor, big_endian_length, 4);
// Close the file and we're done
close(descriptor);
descriptor = -1;
return length_sum;
};
���������������������mmsuper8/mmsuper8dejitter.cpp�����������������������������������������������������������������������0100644�0000764�0000764�00000012330�10172265132�016452� 0����������������������������������������������������������������������������������������������������ustar �michael�������������������������michael����������������������������������������������������������������������������������������������������������������������������������������������������������������������������������������������������������������/***************************************************************************
mmsuper8dejitter - Stabilizes jitter and luminance
-------------------
begin : 6/10/2004
copyright : (C) 2004 by Michael Minn
email : see www.michaelminn.com
-------------------
This program is free software; you can redistribute it and/or modify
it under the terms of version 2 of the GNU General Public License as
published by the Free Software Foundation.
***************************************************************************/
#include
#include
#include
#include
#include
#include
#include
#include
#include
#include
#include "mmpnm.h"
int stabilize(int max_shift, int file_count, char **file_list)
{
int x_shift[file_count];
int y_shift[file_count];
// Find the jitter between frames based on correlation
for (int file = 0; file < (file_count - 1); ++file)
{
mmpnm_file file1;
mmpnm_file file2;
if (file1.load(file_list[file]) < 0)
return -1;
if (file2.load(file_list[file + 1]) < 0)
return -1;
if ((file1.width != file2.width) || (file1.height != file2.height))
return fprintf(stderr, "File dimensions must all be equal: %dx%d vs %dx%d\n",
file1.width, file1.height, file2.width, file2.height);
x_shift[file] = 0;
y_shift[file] = 0;
unsigned int max_correlation = 0;
for (int y_shift_scan = -max_shift, entry = 0; y_shift_scan <= max_shift; ++y_shift_scan)
for (int x_shift_scan = -max_shift; x_shift_scan <= max_shift; ++x_shift_scan, ++entry)
{
unsigned int sum = 0;
for (int y = max_shift; y < (file1.height - max_shift); ++y)
for (int x = max_shift; x < (file1.width - max_shift); ++x)
sum += ((unsigned int) file1.gray_data[(y * file1.width) + x]
* (unsigned int) file2.gray_data
[((y + y_shift_scan) * file2.width)
+ x + x_shift_scan]);
if (sum > max_correlation)
{
max_correlation = sum;
x_shift[file] = x_shift_scan;
y_shift[file] = y_shift_scan;
}
}
printf("Correlating %s and %s (%d x %d); Shift: %d x %d\n",
file_list[file], file_list[file + 1], file1.width, file1.height,
x_shift[file], y_shift[file]);
}
// Shift the frames based on deviation from average
int x_shift_sum = 0;
int y_shift_sum = 0;
for (int file = 1; file < file_count; ++file)
{
mmpnm_file file1;
if (file1.load(file_list[file]) < 0)
return -1;
x_shift_sum -= x_shift[file - 1];
if (x_shift_sum > max_shift)
x_shift_sum = max_shift;
else if (x_shift_sum < -max_shift)
x_shift_sum = -max_shift;
y_shift_sum -= y_shift[file - 1];
if (y_shift_sum > max_shift)
y_shift_sum = max_shift;
else if (y_shift_sum < -max_shift)
y_shift_sum = -max_shift;
printf("%s: shifting %d x %d\n", file_list[file], x_shift_sum, y_shift_sum);
file1.shift(x_shift_sum, y_shift_sum);
if (file1.save(file_list[file]) < 0)
return -1;
}
// Find average luminance
int average_luminance = 0;
int luminance[file_count];
for (int file = 0; file < file_count; ++file)
{
mmpnm_file file1;
if (file1.load(file_list[file]) < 0)
return -1;
luminance[file] = 0;
for (int y = 0, index = 0; y < file1.height; ++y)
for (int x = 0; x < file1.width; ++x, ++index)
luminance[file] += file1.gray_data[index];
luminance[file] /= (file1.width * file1.height);
average_luminance += luminance[file];
printf("%s: Luminance %d\n", file_list[file], luminance[file]);
}
average_luminance /= file_count;
printf("Average luminance: %d\n", average_luminance);
// Modify luminance based on deviation from average
for (int file = 0; file < file_count; ++file)
{
mmpnm_file file1;
if (file1.load(file_list[file]) < 0)
return -1;
printf("%s: luminance correction %f (%d/%d)\n", file_list[file],
average_luminance / (double) luminance[file],
average_luminance, luminance[file]);
for (int index = 0; (index < (file1.width * file1.height)) && luminance[file]; ++index)
{
file1.gray_data[index] = (unsigned char)((int) file1.gray_data[index]
* average_luminance / luminance[file]);
file1.color_data[index * 3] = (unsigned char)((int) file1.color_data[index * 3]
* average_luminance / luminance[file]);
file1.color_data[(index * 3) + 1] = (unsigned char)((int) file1.color_data[(index * 3) + 1]
* average_luminance / luminance[file]);
file1.color_data[(index * 3) + 2] = (unsigned char)((int) file1.color_data[(index * 3) + 2]
* average_luminance / luminance[file]);
}
if (file1.save(file_list[file]) < 0)
return -1;
}
return 0;
}
/************************************************************************
Command Line Interface
************************************************************************/
int print_syntax()
{
fprintf(stderr, "SYNTAX: mmsuper8stabilize ...\n");
fprintf(stderr, "See http:\\\\www.michaelminn.com/linux/mmsuper8 for instructions\n");
return 0;
}
int main(int argc, char **argv)
{
if (argc < 4)
return print_syntax();
int maxshift = atoi(argv[1]);
if (maxshift < 4)
return print_syntax();
stabilize(maxshift, argc - 2, &argv[2]);
return 0;
}
��������������������������������������������������������������������������������������������������������������������������������������������������������������������������������������������������������������������������������������������������������������������������������������������������������mmsuper8/mmavi.cpp����������������������������������������������������������������������������������0100644�0000764�0000764�00000022123�10067304322�014247� 0����������������������������������������������������������������������������������������������������ustar �michael�������������������������michael����������������������������������������������������������������������������������������������������������������������������������������������������������������������������������������������������������������/***************************************************************************
mmavi - Classes for listing and creating AVI files
-------------------
begin : 6/5/2004
copyright : (C) 2004 by Michael Minn
email : see www.michaelminn.com
-------------------
This program is free software; you can redistribute it and/or modify
it under the terms of version 2 of the GNU General Public License as
published by the Free Software Foundation.
***************************************************************************/
#include
#include
#include
#include
#include
#include "mmavi.h"
int mmavi_file::open_file(char *filename, int is_black_and_white, int frames_per_second)
{
if (!this)
return -EINVAL;
if (frames_per_second <= 0)
{
fprintf(stderr, "Invalid frames per second value %d\n", frames_per_second);
return -EINVAL;
}
memset(this, 0, sizeof(*this));
this->is_black_and_white = is_black_and_white;
this->frames_per_second = frames_per_second;
if ((descriptor = open(filename, O_WRONLY | O_CREAT | O_TRUNC, 0664)) < 0)
{
int status = -errno;
perror(filename);
return status;
}
write_header();
return descriptor;
}
int mmavi_file::add_frame(mmpnm_file *frame)
{
if (!this || (descriptor < 0))
return -EINVAL;
if (!frame_width || !frame_height)
{
frame_width = frame->width;
frame_height = frame->height;
}
else if ((frame_width != frame->width) || (frame_height != frame->height))
{
fprintf(stderr, "Cropping %d x %d frame to %d x %d\n",
frame->width, frame->height, frame_width, frame_height);
frame->crop(frame_width, frame_height);
}
// As with everything Micro$oft, the order of data in an RGB frame is
// reversed: bytes are BGR and scan from lower left to top right.
// Also, frame widths must be exact multiples of four.
int length = 0;
unsigned char *output = NULL;
int actual_width = frame_width & 0xfffffffc;
if (is_black_and_white)
{
length = actual_width * frame_height;
output = new unsigned char[length];
for (int y = frame_height - 1; y >= 0; --y)
{
unsigned char *source = &frame->gray_data[y * frame_width];
unsigned char *destination = &output[(frame_height - y - 1) * actual_width];
for (int x = 0; x < actual_width; ++x, ++source, ++destination)
*destination = *source;
}
}
else // RGB
{
length = actual_width * frame_height * 3;
output = new unsigned char[length];
for (int y = 0; y < frame_height; ++y)
{
unsigned char *source = &frame->color_data[y * frame_width * 3];
unsigned char *destination = &output[(frame_height - y - 1) * actual_width * 3];
for (int x = actual_width; x; --x, source += 3, destination += 3)
{
*destination = source[2];
destination[1] = source[1];
destination[2] = *source;
}
}
}
char chunk_header[8];
memcpy(chunk_header, "00db", 4);
*((int*) &chunk_header[4]) = length;
if ((write(descriptor, chunk_header, 8) < 0) || (write(descriptor, output, length) < 0))
{
int status = -errno;
perror("Failure writing frame data");
return status;
}
delete output;
++frame_count;
return length;
}
int mmavi_file::close_file()
{
if (!this || (descriptor < 0))
return -EINVAL;
write_header();
close(descriptor);
descriptor = -1;
return -EINVAL;
}
int mmavi_file::write_header()
{
if (!this || (descriptor < 0))
return -EINVAL;
struct stat file_info;
if (fstat(descriptor, &file_info) < 0)
{
perror("Failure finding file length for header write");
return -1;
}
int header_size = 0;
int frame_size = frame_width * frame_height * 3;
if (is_black_and_white)
frame_size = frame_width * frame_height;
mmavi_container_chunk riff_header;
memcpy(riff_header.chunk_name, "RIFF", 4);
riff_header.chunk_length = file_info.st_size - 8;
memcpy(riff_header.content_type, "AVI ", 4);
header_size += 12;
mmavi_container_chunk header_list;
memcpy(header_list.chunk_name, "LIST", 4);
memcpy(header_list.content_type, "hdrl", 4);
int header_list_start = header_size + 8;
header_size += 12;
mmavi_avi_header avi_header;
memcpy(avi_header.chunk_name, "avih", 4);
avi_header.chunk_length = sizeof(avi_header) - 8;
avi_header.microseconds_per_frame = 1000000 / frames_per_second;
avi_header.max_bytes_per_second = frame_size * frames_per_second;
//avi_header.flags = 0x10; // ???
avi_header.total_frames = frame_count;
avi_header.streams = 1;
avi_header.suggested_buffer_size = avi_header.max_bytes_per_second;
avi_header.width = frame_width;
avi_header.height = frame_height;
avi_header.scale = 1;
avi_header.rate = frames_per_second;
avi_header.length = frame_count;
header_size += sizeof(avi_header);
mmavi_container_chunk stream_list;
memcpy(stream_list.chunk_name, "LIST", 4);
memcpy(stream_list.content_type, "strl", 4);
int stream_list_start = header_size + 8;
header_size += 12;
mmavi_stream_header stream_header;
memcpy(stream_header.chunk_name, "strh", 4);
stream_header.chunk_length = sizeof(stream_header) - 8;
memcpy(stream_header.stream_type, "vids", 4);
memcpy(stream_header.stream_handler, "RLE ", 4);
stream_header.scale = avi_header.scale;
stream_header.rate = avi_header.rate;
stream_header.length = avi_header.length;
stream_header.suggested_buffer_size = avi_header.suggested_buffer_size;
//stream_header.quality = 8500; // ??
header_size += sizeof(stream_header);
mmavi_image_format image_format;
memcpy(image_format.chunk_name, "strf", 4);
image_format.chunk_length = sizeof(mmavi_image_format) - 8;
image_format.structure_size = 40;
image_format.width = frame_width;
image_format.height = frame_height;
image_format.planes = 1;
image_format.depth = 24;
image_format.compression = 0;
image_format.byte_size = frame_size;
//image_format.minimum_colors = 0x1000000;
image_format.minimum_colors = 256;
header_size += sizeof(image_format);
unsigned char color_table[1024];
if (is_black_and_white)
{
image_format.chunk_length += 1024;
//image_format.compression = 1; // indexed color
image_format.depth = 8;
image_format.minimum_colors = 256;
header_size += 1024;
for (int init = 0; init < 1024; init += 4)
{
color_table[init] = init / 4;
color_table[init + 1] = init / 4;
color_table[init + 2] = init / 4;
color_table[init + 3] = 0;
}
}
stream_list.chunk_length = header_size - stream_list_start;
header_list.chunk_length = header_size - header_list_start;
mmavi_container_chunk movie_data_list;
movie_data_list.chunk_length = file_info.st_size - header_size - 8;
memcpy(movie_data_list.chunk_name, "LIST", 4);
memcpy(movie_data_list.content_type, "movi", 4);
if (lseek(descriptor, 0, SEEK_SET) < 0)
{
perror("Failure seeking file start for header write");
return -1;
}
write(descriptor, &riff_header, sizeof(riff_header));
write(descriptor, &header_list, sizeof(header_list));
write(descriptor, &avi_header, sizeof(avi_header));
write(descriptor, &stream_list, sizeof(stream_list));
write(descriptor, &stream_header, sizeof(stream_header));
write(descriptor, &image_format, sizeof(image_format));
if (is_black_and_white)
write(descriptor, color_table, sizeof(color_table));
write(descriptor, &movie_data_list, sizeof(movie_data_list));
return file_info.st_size;
}
int mmavi_list(char *filename)
{
int descriptor = -1;
char *buffer = NULL;
char *scan = NULL;
char *current_stream = "";
struct stat file_info;
if ((descriptor = open(filename, O_RDONLY)) < 0)
perror(filename);
else if (fstat(descriptor, &file_info) < 0)
perror(filename);
else if ((scan = (buffer = new char[file_info.st_size])) == NULL)
perror("Buffer allocation failure");
else if (read(descriptor, buffer, file_info.st_size) < 0)
perror(filename);
else while (scan < &buffer[file_info.st_size])
{
int chunk_size = *((int*) &scan[4]);
int length = (9 + chunk_size) & 0xfffffffe;
if (strncmp(scan, "RIFF", 4) == 0)
{
printf("%.4s:%.4s %d/%d bytes\n", scan, &scan[8], chunk_size, length);
scan += 12;
}
else if (strncmp((char*) scan, "LIST", 4) == 0)
{
printf("%.4s/%.4s: %d/%d bytes\n", (char*) scan, (char*) &scan[8],
chunk_size + 4, chunk_size + 12);
scan += 12;
}
// Error ID - 0x80040265
else if (strncmp((char*) scan, "avih", 4) == 0)
{
((mmavi_avi_header*) scan)->list();
scan += length;
}
else if (strncmp((char*) scan, "strh", 4) == 0)
{
((mmavi_stream_header*) scan)->list();
current_stream = &scan[8];
scan += length;
}
else if ((strncmp(scan, "strf", 4) == 0) && (strncmp(current_stream, "vids", 4) == 0))
{
((mmavi_image_format*) scan)->list();
scan += length;
}
else if ((strncmp(scan, "strf", 4) == 0) && (strncmp(current_stream, "auds", 4) == 0))
{
((mmavi_sound_format*) scan)->list();
scan += length;
}
else if (strncmp((char*) scan, "strn", 4) == 0)
{
printf("Comment (%d/%d bytes): %s\n", chunk_size, length, &scan[8]);
scan += length;
}
else
{
printf("%.4s: %d bytes\n", (char*) scan, length);
scan += length;
}
}
if (descriptor >= 0)
close(descriptor);
return 0;
}
���������������������������������������������������������������������������������������������������������������������������������������������������������������������������������������������������������������������������������������������������������������������������������������������������������������������������������������������������������������������������������������������������������������������������������������������mmsuper8/mmsuper8play.cpp���������������������������������������������������������������������������0100644�0000764�0000764�00000022655�10172352624�015623� 0����������������������������������������������������������������������������������������������������ustar �michael�������������������������michael����������������������������������������������������������������������������������������������������������������������������������������������������������������������������������������������������������������/***************************************************************************
mmsuper8play - Player for PNM frame files
-------------------
begin : 6/7/2004
copyright : (C) 2004 by Michael Minn
email : see www.michaelminn.com
-------------------
This program is free software; you can redistribute it and/or modify
it under the terms of version 2 of the GNU General Public License as
published by the Free Software Foundation.
***************************************************************************/
#include
#include
#include
#include
#include
#include
#include
#include
#include "mmpnm.h"
#include
#include
#include
#include // includes keysymdef.h - needed for XK_* constants
#define MMSUPER8PLAY_VERSION "MMSUPER8PLAY v2004.06.26"
#define MMSUPER8PLAY_SCREEN_HEIGHT 400
#define MMSUPER8PLAY_SCREEN_WIDTH 540
#define MMSUPER8PLAY_DEFAULT_FPS 18
#define MMSUPER8PLAY_REFRESH_MS 20
class mmsuper8play
{
public:
mmsuper8play(int argc, char **argv);
int refresh_screen();
int list_screen_info();
int change_pitch(int new_pitch);
int y_shift;
int file_count;
int current_fps;
int current_file;
char **file_list;
struct timeval last_frame_time;
XtAppContext application;
Widget shell;
Pixmap pixmap;
};
/**************************** Callback Functions ****************************/
void refresh_callback(XtPointer context_pointer, XtIntervalId *interval)
{
mmsuper8play *player = (mmsuper8play*) context_pointer;
player->refresh_screen();
//if (player->current_fps == 0)
// XtAppAddTimeOut(player->application, 1000, refresh_callback, context_pointer);
//else
XtAppAddTimeOut(player->application, MMSUPER8PLAY_REFRESH_MS,
refresh_callback, context_pointer);
}
void key_callback(Widget widget, XtPointer client_data, XEvent *event, Boolean *continue_flag)
{
// KeySym definitions are in /usr/X11R6/include/X11/keysymdef.h
int keysym = XKeycodeToKeysym(event->xkey.display, event->xkey.keycode, 0);
mmsuper8play *player = (mmsuper8play*) client_data;
// printf("Key press %x %x\n", event->type, keysym);
if ((event->type & KeyPressMask) && (keysym == XK_Left))
{
player->current_fps -= 2;
printf("%d fps\n", player->current_fps);
}
else if ((event->type & KeyPressMask) && (keysym == XK_Right))
{
player->current_fps += 2;
printf("%d fps\n", player->current_fps);
}
else if ((event->type & KeyPressMask) && (keysym == XK_Up))
{
++player->y_shift;
printf("Shift %d pixels\n", -player->y_shift);
}
else if ((event->type & KeyPressMask) && (keysym == XK_Down))
{
--player->y_shift;
printf("Shift %d pixels\n", -player->y_shift);
}
else if ((event->type & KeyPressMask) && (keysym == XK_Home))
{
player->current_fps = 0;
player->current_file = 1;
}
else if ((event->type & KeyPressMask) && (keysym == XK_End))
{
player->current_fps = 0;
player->current_file = player->file_count - 1;
}
else if ((event->type & KeyPressMask) && (keysym == XK_space))
{
player->current_fps = 0;
if (player->current_file < (player->file_count - 1))
++player->current_file;
}
else if ((event->type & KeyPressMask) && (keysym == XK_Page_Up))
{
if ((player->current_file + MMSUPER8PLAY_DEFAULT_FPS) < player->file_count)
player->current_file += MMSUPER8PLAY_DEFAULT_FPS;
}
else if ((event->type & KeyPressMask) && (keysym == XK_Page_Down))
{
if ((player->current_file - MMSUPER8PLAY_DEFAULT_FPS) > 0)
player->current_file -= MMSUPER8PLAY_DEFAULT_FPS;
}
else if ((event->type & KeyPressMask) && (keysym == XK_Return))
{
if (player->current_fps == 0)
player->current_fps += MMSUPER8PLAY_DEFAULT_FPS;
else
player->current_fps = 0;
}
/**
else if ((event->type & KeyPressMask) && (player->current_fps == 0) && (player->y_shift != 0)
&& ((keysym == XK_S) || (keysym == XK_s)))
{
printf("Shifting %s by %d pixels\n",
player->file_list[player->current_file], player->y_shift);
mmpnm_file input_file;
if (input_file.load(player->file_list[player->current_file]) < 0)
return;
else if (input_file.shift(0, player->y_shift) < 0)
return;
else
input_file.save(player->file_list[player->current_file]);
}
**/
else if ((event->type & KeyPressMask) && ((keysym == XK_Q) || (keysym == XK_q)))
exit(0);
}
/**************************** Classed Functions ****************************/
int mmsuper8play::refresh_screen()
{
struct timeval current_time;
gettimeofday(¤t_time, NULL);
int ms_since_last_frame = ((current_time.tv_sec - last_frame_time.tv_sec) * 1000)
+ ((current_time.tv_usec - last_frame_time.tv_usec) / 1000);
//printf("%d %d\n", ms_since_last_frame, abs(1000 / current_fps));
if ((current_fps != 0) && (ms_since_last_frame >= abs(1000 / current_fps)))
{
last_frame_time = current_time;
if ((current_fps > 0) && (current_file < (file_count - 1)))
++current_file;
else if ((current_fps < 0) && (current_file > 1))
--current_file;
}
// printf("%d %d\n", current_file, ms_since_last_frame);
if (current_file < 1)
return 0;
mmpnm_file input_file;
int status = input_file.load(file_list[current_file]);
if (status < 0)
return status;
XtVaSetValues(shell, XtNtitle, file_list[current_file], NULL);
Display *display = XtDisplay(shell);
Window window = XtWindow(shell);
Visual *visual = DefaultVisual(display, DefaultScreen(display));
GC graphic_context = DefaultGC(display, DefaultScreen(display));
//XSetWindowBackground(XtDisplay(shell),window, BlackPixelOfScreen(DefaultScreenOfDisplay(display)));
int depth = DefaultDepth(display, DefaultScreen(display));
int bytes_per_pixel = depth / 8;
if (bytes_per_pixel > 4)
{
fprintf(stderr, "No support provided for graphic displays over 32 bit depth\n");
return -EINVAL;
}
int masks[3] = { visual->blue_mask, visual->green_mask, visual->red_mask };
int shift[3] = { 0, 0, 0 };
for (int color = 0; color < 3; ++color)
{
for (int scan = masks[color]; scan; scan >>= 1)
++shift[color];
shift[color] = (8 * (color + 1)) - shift[color];
}
//printf("Shifts %d %x, %d %x, %d %x\n", shift[2], masks[2],
// shift[1], masks[1], shift[0], masks[0]);
int data_length = input_file.width * input_file.height * bytes_per_pixel;
char *pixmap_data = XtMalloc(data_length);
memset(pixmap_data, 0, data_length);
mmpnm_file shifted;
shifted.copy(&input_file);
shifted.shift(0, y_shift);
for (int y = 0, source = 0, destination = 0; y < input_file.height; ++y)
for (int x = 0; x < input_file.width; ++x, source += 3, destination += bytes_per_pixel)
{
int total = 0;
int red = 0;
int green = 0;
int blue = 0;
if ((y >= 0) && (y < input_file.height))
{
red = shifted.color_data[source];
green = shifted.color_data[source + 1];
blue = shifted.color_data[source + 2];
}
total |= ((blue >> shift[0]) & masks[0]);
total |= (((green << 8) >> shift[1]) & masks[1]);
total |= (((red << 16) >> shift[2]) & masks[2]);
memcpy(&pixmap_data[destination], &total, bytes_per_pixel);
}
XImage *image = XCreateImage(display, visual, depth, ZPixmap, 0,
pixmap_data,
input_file.width, input_file.height, 8,
input_file.width * bytes_per_pixel);
if (!image)
{
perror("Failure creating image");
return -1;
}
XPutImage(display, window, graphic_context, image, 0, 0, 0, 0,
MMSUPER8PLAY_SCREEN_WIDTH, MMSUPER8PLAY_SCREEN_HEIGHT);
// Note that this deletes the "image" structure as well as the pixmap_data
XDestroyImage(image);
return 0;
}
int mmsuper8play::list_screen_info()
{
Screen *screen = XtScreen(shell);
Visual *visual = screen->root_visual;
printf("%d Available depths\n", screen->ndepths);
for (int depth = 0; depth < screen->ndepths; ++depth)
for (int visual = 0; visual < screen->depths[depth].nvisuals; ++visual)
printf(" Depth %d, Visual %d: %d bits per color, masks %x/%x/%x\n",
depth, visual,
(int) screen->depths[depth].visuals[visual].bits_per_rgb,
(int) screen->depths[depth].visuals[visual].red_mask,
(int) screen->depths[depth].visuals[visual].green_mask,
(int) screen->depths[depth].visuals[visual].blue_mask);
printf("Root Visual\n");
printf(" %d bits per pixel\n", screen->root_depth);
printf(" Masks %x %x %x, bits per color %d\n",
(int) visual->red_mask, (int) visual->green_mask,
(int) visual->blue_mask, (int) visual->bits_per_rgb);
return 0;
}
mmsuper8play::mmsuper8play(int argc, char **argv)
{
memset(this, 0, sizeof(*this));
String default_resources[] = {
"mmsuper8play*background: black",
"mmsuper8play*foreground: black",
NULL };
file_count = argc;
file_list = argv;
current_file = 1;
shell = XtVaOpenApplication (&application, "player", NULL, 0,
&argc, argv, default_resources, sessionShellWidgetClass,
XtNwidth, MMSUPER8PLAY_SCREEN_WIDTH,
XtNheight, MMSUPER8PLAY_SCREEN_HEIGHT,
XtNtitle, "MMSUPER8PLAY",
//XmNmwmDecorations, MWM_DECOR_ALL | MWM_DECOR_RESIZEH,
NULL);
XtAddEventHandler(shell, 0xffff, 0, (XtEventHandler) &key_callback, (XtPointer) this);
XtRealizeWidget(shell);
gettimeofday(&last_frame_time, NULL);
current_fps = MMSUPER8PLAY_DEFAULT_FPS;
}
int main(int argc, char **argv)
{
fprintf(stderr, "%s\n", MMSUPER8PLAY_VERSION);
mmsuper8play player(argc, argv);
player.list_screen_info();
XtAppAddTimeOut(player.application, MMSUPER8PLAY_REFRESH_MS, refresh_callback, (XtPointer) &player);
XtAppMainLoop(player.application);
return 0;
}
�����������������������������������������������������������������������������������mmsuper8/Makefile�����������������������������������������������������������������������������������0100644�0000764�0000764�00000003334�10172273070�014077� 0����������������������������������������������������������������������������������������������������ustar �michael�������������������������michael����������������������������������������������������������������������������������������������������������������������������������������������������������������������������������������������������������������BUILD = `date +"%Y.%m.%d"`
VERSION = '"v2005.01.15 (c)2004 by Michael Minn"'
CFLAGS = -O0 -g -Wall -DVERSION=$(VERSION)
X11=-I/usr/X11R6/include -L/usr/X11R6/lib -lXt
LINKFLAGS = $(CFLAGS) -lz
EXECUTABLES = mmsuper8frame mmsuper8play mmsuper8dejitter mmsuper8deflicker \
mmsuper8jitter mmsuper8list mmsuper8avi mmsuper8mov mmsuper8normalize
all: $(EXECUTABLES)
install: $(EXECUTABLES)
cp -f $(EXECUTABLES) /usr/local/bin
clean:
rm -f *.o $(EXECUTABLES) core
mmpnm.o: mmpnm.cpp mmpnm.h
g++ $(CFLAGS) -c mmpnm.cpp
mmquicktime.o: mmquicktime.cpp mmquicktime.h mmpnm.o
g++ $(CFLAGS) -c mmquicktime.cpp
mmavi.o: mmavi.cpp mmavi.h mmpnm.o
g++ $(CFLAGS) -c mmavi.cpp
mmsuper8frame: mmsuper8frame.cpp mmpnm.o
g++ $(LINKFLAGS) mmpnm.o mmsuper8frame.cpp -o mmsuper8frame
mmsuper8play: mmsuper8play.cpp mmpnm.o
g++ $(LINKFLAGS) $(X11) mmpnm.o mmsuper8play.cpp -o mmsuper8play
mmsuper8dejitter: mmsuper8dejitter.cpp mmpnm.o
g++ $(LINKFLAGS) $(X11) mmpnm.o mmsuper8dejitter.cpp -o mmsuper8dejitter
mmsuper8deflicker: mmsuper8deflicker.cpp mmpnm.o
g++ $(LINKFLAGS) $(X11) mmpnm.o mmsuper8deflicker.cpp -o mmsuper8deflicker
mmsuper8jitter: mmsuper8jitter.cpp mmpnm.o
g++ $(LINKFLAGS) $(X11) mmpnm.o mmsuper8jitter.cpp -o mmsuper8jitter
mmsuper8list: mmsuper8list.cpp mmquicktime.o mmavi.o mmpnm.o
g++ $(LINKFLAGS) $(X11) mmpnm.o mmquicktime.o mmavi.o mmsuper8list.cpp -o mmsuper8list
mmsuper8avi: mmsuper8avi.cpp mmavi.o mmpnm.o
g++ $(LINKFLAGS) mmpnm.o mmavi.o mmsuper8avi.cpp -o mmsuper8avi
mmsuper8mov: mmsuper8mov.cpp mmquicktime.o mmpnm.o
g++ $(LINKFLAGS) mmpnm.o mmquicktime.o mmsuper8mov.cpp -o mmsuper8mov
mmsuper8normalize: mmsuper8normalize.cpp mmpnm.o
g++ $(LINKFLAGS) $(X11) mmpnm.o mmsuper8normalize.cpp -o mmsuper8normalize
����������������������������������������������������������������������������������������������������������������������������������������������������������������������������������������������������������������������������������������������������������������������������������������������������mmsuper8/mmsuper8mov.cpp����������������������������������������������������������������������������0100644�0000764�0000764�00000006315�10172267364�015460� 0����������������������������������������������������������������������������������������������������ustar �michael�������������������������michael����������������������������������������������������������������������������������������������������������������������������������������������������������������������������������������������������������������/***************************************************************************
mmsuper8avi.cpp - Converts PNM super8 frame scans to a .AVI file
-------------------
begin : 5/31/2004, 1/15/2005
copyright : (C) 2004 by Michael Minn
email : see www.michaelminn.com
-------------------
***************************************************************************/
#include
#include
#include
#include
#include
#include
#include
#include
#include
#include
#include "mmpnm.h"
//#include "mmavi.h"
#include "mmquicktime.h"
/************************************************************************
Command Line Interface
************************************************************************/
int print_syntax()
{
fprintf(stderr, "mmsuper8mov - Combines .ppm/.pgm/.pnm frames into a single uncompressed .mov (Quicktime) file\n\n");
fprintf(stderr, "mmsuper8mov [options] framefile...\n\n");
fprintf(stderr, " -o output_file \n");
fprintf(stderr, " Specifies name of output file (default is movie.mov)\n\n");
fprintf(stderr, " -b\n");
fprintf(stderr, " Output file should be black-and-white (i.e. grayscale)\n\n");
fprintf(stderr, " -rate fps\n");
fprintf(stderr, " Specifies frame rate (default is 18 bps)\n");
return 0;
}
int main(int argc, char **argv)
{
int frames_per_second = 18;
int color_mode = MMQUICKTIME_COLOR_MODE_RGB;
char *output_filename = "movie.mov";
fprintf(stderr, "%s\n", VERSION);
// First pass through arguments for options
for (int argument = 1; argument < argc; ++argument)
if (strstr(argv[argument], "-o") && ((argument + 1) < argc))
{
++argument;
output_filename = argv[argument];
}
else if (strstr(argv[argument], "-rate") && ((argument + 1) < argc))
{
++argument;
frames_per_second = atoi(argv[argument]);
}
else if (strcmp(argv[argument], "-b") == 0)
{
color_mode = MMQUICKTIME_COLOR_MODE_GRAY;
fprintf(stderr, "Output will be black and white (grayscale)\n");
}
else if (strncmp(argv[argument], "-h", 2) == 0)
return print_syntax();
else if (strstr(argv[argument], ".ppm")
|| strstr(argv[argument], ".pgm")
|| strstr(argv[argument], ".pnm"))
continue; // processed below in 2nd pass
else
{
fprintf(stderr, "Invalid argument: %s\n", argv[argument]);
return print_syntax();
}
// Open output file
mmquicktime_file quicktime_file;
if (quicktime_file.open_file(output_filename, color_mode, frames_per_second) < 0)
return -1;
// Second pass through arguments to process input files and context sensitive parameters
int frame_count = 0;
for (int argument = 1; argument < argc; ++argument)
if (argv[argument][0] != '-')
{
mmpnm_file file;
if (file.load(argv[argument]) >= 0)
{
fprintf(stderr, "%s: %d x %d\n", argv[argument], file.width, file.height);
if (file.width < file.height)
fprintf(stderr, " File does not appear to be a frame file\n");
else
{
quicktime_file.add_frame(&file);
++frame_count;
}
}
}
quicktime_file.close_file();
fprintf(stderr, "%d frames saved\n", frame_count);
return 0;
}
�������������������������������������������������������������������������������������������������������������������������������������������������������������������������������������������������������������������������������������������������������������������������������������������������������������������mmsuper8/mmpnm.cpp����������������������������������������������������������������������������������0100644�0000764�0000764�00000053724�10172275106�014301� 0����������������������������������������������������������������������������������������������������ustar �michael�������������������������michael����������������������������������������������������������������������������������������������������������������������������������������������������������������������������������������������������������������/***************************************************************************
mmpnm - Utilities for loading PNM (Portable Anymap) files
-------------------
begin : 6/4/2004
copyright : (C) 2004 by Michael Minn
email : see www.michaelminn.com
-------------------
This program is free software; you can redistribute it and/or modify
it under the terms of version 2 of the GNU General Public License as
published by the Free Software Foundation.
***************************************************************************/
#include
#include
#include
#include
#include
#include
#include
#include "mmpnm.h"
/*******************************************************************/
int mmpnm_framing::set_resolution(int new_resolution)
{
if (new_resolution < 600)
{
fprintf(stderr, "Invalid resolution %ddpi: Resolution must be >= 600dpi\n", new_resolution);
new_resolution = 600;
}
memset(this, 0, sizeof(*this));
resolution_dpi = new_resolution;
film_width = FILM_WIDTH_1200_DPI * resolution_dpi / 1200;
frame_width = FRAME_WIDTH_1200_DPI * resolution_dpi / 1200;
frame_height = FRAME_HEIGHT_1200_DPI * resolution_dpi / 1200;
sprocket_height = SPROCKET_HEIGHT_1200_DPI * resolution_dpi / 1200;
sprocket_width = SPROCKET_WIDTH_1200_DPI * resolution_dpi / 1200;
sprocket_to_edge = SPROCKET_TO_EDGE_1200_DPI * resolution_dpi / 1200;
sprocket_area_width = SPROCKET_AREA_WIDTH_1200_DPI * resolution_dpi / 1200;
return 0;
}
/*******************************************************************/
mmpnm_file::~mmpnm_file()
{
if (color_data)
delete color_data;
if (gray_data)
delete gray_data;
}
int mmpnm_file::add_flicker(int flicker_level)
{
if ((flicker_level <= 1) || !this || !gray_data || !color_data)
return -EINVAL;
int level = random() % flicker_level;
printf("Adding flicker: level %d\n", level);
for (int y = 0; y < height; ++y)
for (int x = 0; x < width; ++x)
for (int color = -1; color < 3; ++color)
add_pixel(level, x, y, color);
return 0;
}
int mmpnm_file::add_grain(int grain_level, int grain_count)
{
if ((grain_level < 1) || !this || !gray_data || !color_data)
return -EINVAL;
if (grain_count <= 0)
grain_count = width * height * 2;
printf("Adding grain: level %d, count %d\n", grain_level, grain_count);
for (int count = 0; count < grain_count; ++count)
{
float x = (random() % (width * 256)) / 256.0;
float y = (random() % (height * 256)) / 256.0;
int level = random() % grain_level;
for (int color = -1; color < 3; ++color)
{
add_point(level, x, y, color);
add_point(level, x + 1, y, color);
}
}
return 0;
}
int mmpnm_file::add_jitter(float max_jitter)
{
if ((max_jitter < 1) || !this || !gray_data || !color_data)
return -EINVAL;
float x_shift = (random() % (int) (max_jitter * 256)) / 256.0;
float y_shift = (random() % (int) (max_jitter * 256)) / 256.0;
fprintf(stderr, "Jitter shifting %f x %f\n", x_shift, y_shift);
return shift(x_shift, y_shift);
}
int mmpnm_file::add_noise(int max_grain)
{
if ((max_grain < 1) || !this || !gray_data || !color_data)
return -EINVAL;
for (int y = 0, index = 0; y < height; ++y)
for (int x = 0; x < width; ++x, ++index)
{
if (gray_data[index] < 128)
gray_data[index] += (random() % max_grain);
else
gray_data[index] -= (random() % max_grain);
for (int color = 0; color < 3; ++color)
if (color_data[(index * 3) + color] < 128)
color_data[(index * 3) + color] += (random() % max_grain);
else
color_data[(index * 3) + color] -= (random() % max_grain);
}
return 0;
}
int mmpnm_file::add_pixel(int level, int x, int y, int color)
{
if (!this || !gray_data || !color_data || (x < 0) || (x >= width) || (y < 0) || (y >= height))
return -1;
if (color < 0)
{
if ((gray_data[(y * width) + x] + level) > 255)
gray_data[(y * width) + x] = 255;
else
gray_data[(y * width) + x] += level;
}
else
{
if ((color_data[(y * width * 3) + x + color] + level) > 255)
color_data[(y * width * 3) + x + color] = 255;
else
color_data[(y * width * 3) + x + color] += level;
}
return 0;
}
int mmpnm_file::add_point(int level, float x, float y, int color)
{
int low_x = (int) floorf(x);
int low_y = (int) floorf(y);
float x_interpolate = x - low_x;
float y_interpolate = y - low_y;
if (!this || !gray_data || !color_data
|| (low_x < 0) || (low_y < 0)
|| ((low_x + 1) >= width) || ((low_y + 1) >= height))
return -1;
//printf(" Level %d %f %f\n", (unsigned char) (level * y_interpolate * x_interpolate),
//y_interpolate, x_interpolate);
add_pixel((int)(level * (1 - x_interpolate) * (1 - y_interpolate)), low_x, low_y, color);
add_pixel((int)(level * x_interpolate * (1 - y_interpolate)), low_x + 1, low_y, color);
add_pixel((int)(level * (1 - x_interpolate) * y_interpolate), low_x, low_y + 1, color);
add_pixel((int)(level * x_interpolate * y_interpolate), low_x + 1, low_y + 1, color);
return 0;
}
int mmpnm_file::add_to_list(mmpnm_file *&list)
{
if (!this)
return -EINVAL;
if (!list)
{
list = this;
return 0;
}
int count = 0;
mmpnm_file *scan = list;
while (scan->next)
{
scan = scan->next;
++count;
}
scan->next = this;
return count;
}
int mmpnm_file::adjust_color(int color, int low_value, int high_value)
{
if (!this || !color_data)
return -EINVAL;
if (low_value < 0)
low_value = 0;
if (high_value > 255)
high_value = 255;
if (high_value <= low_value)
return -EINVAL;
for (int y = 0, index = color; y < height; ++y)
for (int x = 0; x < width; ++x, index += 3)
{
int value = color_data[index];
value = (value - low_value) * 255 / (high_value - low_value);
if (value < 0)
value = 0;
if (value > 255)
value = 255;
color_data[index] = (unsigned char) value;
}
return 0;
}
int mmpnm_file::adjust_midpoint(int color, int midpoint)
{
if (!this || !color_data || !gray_data)
return -EINVAL;
if (midpoint <= 0)
midpoint = 1;
if (midpoint >= 255)
midpoint = 254;
if (color == 3)
{
for (int y = 0, index = 0; gray_data && (y < height); ++y)
for (int x = 0; x < width; ++x, ++index)
{
int value = gray_data[index];
if (value <= midpoint)
value = 127 * value / midpoint;
else
value = 127 + (127 * (value - midpoint) / (255 - midpoint));
if (value < 0)
value = 0;
if (value > 255)
value = 255;
gray_data[index] = (unsigned char) value;
}
}
else
{
for (int y = 0, index = color; color_data && (y < height); ++y)
for (int x = 0; x < width; ++x, index += 3)
{
int value = color_data[index];
if (value <= midpoint)
value = 127 * value / midpoint;
else
value = 127 + (127 * (value - midpoint) / (255 - midpoint));
if (value < 0)
value = 0;
if (value > 255)
value = 255;
color_data[index] = (unsigned char) value;
}
}
return 0;
}
int mmpnm_file::clear()
{
if (!this || !gray_data || !color_data)
return -1;
memset(gray_data, 0, width * height);
memset(color_data, 0, width * height * 3);
return 0;
}
int mmpnm_file::convert_to_frames(mmpnm_file *&frames, mmpnm_framing ¶meters)
{
if (!gray_data || !color_data)
return -EINVAL;
// Leave some space at bottom for searching unless using fixed
// frame height (i.e. ignore sprocket holes)
float bottom = height - (2 * parameters.frame_height);
if (parameters.ignore_sprocket_holes)
bottom = height - parameters.frame_height;
// Scan the image from top to bottom
int frame_count = 0;
for (float frame_top = parameters.frame_offset;
frame_top < bottom;
frame_top += parameters.frame_height, ++frame_count)
{
char message[256] = "";
// Find range of levels in frame
int lo_value = 255;
int hi_value = 0;
for (int y = 0; y < (int) parameters.frame_height; ++y)
for (int x = 0, index = ((int) frame_top + y) * width; x < width; ++x, ++index)
{
if (hi_value < gray_data[index])
hi_value = gray_data[index];
if (lo_value > gray_data[index])
lo_value = gray_data[index];
}
// Find the left and right edges of the film
int left_x = 0;
int right_x = width;
int threshold = (lo_value + hi_value) / 2;
for (int y = 0; y < (int) parameters.frame_height; ++y)
{
int x = 0;
int index = ((int) frame_top + y) * width;
while ((x < width) && (gray_data[index] > threshold))
{
++x;
++index;
}
if (x > left_x)
left_x = x;
x = width - 1;
index = (((int) frame_top + y + 1) * width) - 1;
while ((x > 0) && (gray_data[index] > 128))
{
--x;
--index;
}
if (x < right_x)
right_x = x;
}
// Home movies may have sections that are completely overexposed and have
// no detectable edges. Assume the frame is in the middle of the image.
if (right_x < left_x)
{
left_x = (width - parameters.film_width) / 2;
right_x = left_x + parameters.film_width;
sprintf(&message[strlen(message)], "No detectable edges. ");
}
int minimum_film_width = parameters.film_width - (parameters.film_width / 20);
// Commercial prints may have a clear sprocket area. The detected right
// edge can be used for horizontal framing when the clear sprocket area
// abuts a light image area and there is no consistent left edge.
if (parameters.frame_from_right)
{
sprintf(&message[strlen(message)], "Framing from right. ");
left_x = right_x - parameters.frame_width - parameters.sprocket_area_width;
}
// Otherwise, the detected left edge should be good. Assume a clear sprocket area
// if detected width is less expected film width.
else if ((right_x - left_x) < minimum_film_width)
{
sprintf(&message[strlen(message)], "Clear sprocket area. ");
left_x -= parameters.sprocket_area_width;
}
int frame_width = parameters.frame_width - parameters.clip_left - parameters.clip_right;
int frame_height = (int) parameters.frame_height
- parameters.clip_top - parameters.clip_bottom;
// Find frame by correlation of sprocket holes. When detecting sprocket holes,
// even with clear sprocket area, the sprocket hole should be brighter than the
// surrounding film area. Scan y values the length of a frame and find the brightest
// patch that correlates with an area the size of a sprocket hole.
// printf("Looking for sprocket at y %d, x %d -> %d, from edge %d, hole %d x %d\n",
// frame_top, left_x, right_x, parameters.sprocket_to_edge,
// parameters.sprocket_width, parameters.sprocket_height);
int correlation = 0;
int frame_offset = 0;
if (!parameters.ignore_sprocket_holes)
for (int offset_scan = 0;
offset_scan < (int) parameters.frame_height;
++offset_scan)
{
int total = 0;
for (int y = 0; y < parameters.sprocket_height; ++y)
{
int index = (((int) frame_top + offset_scan + y) * width)
+ left_x + parameters.sprocket_to_edge;
for (int x = 0; x < parameters.sprocket_width; ++x, ++index)
total += gray_data[index];
}
if (total > correlation)
{
correlation = total;
frame_offset = offset_scan - (((int) parameters.frame_height
- parameters.sprocket_height) / 2);
}
}
// Copy the frame into a new file
frame_top += frame_offset;
int frame_x = left_x + parameters.sprocket_area_width + parameters.clip_left;
int frame_y = (int) frame_top + parameters.clip_top;
mmpnm_file *new_frame = new mmpnm_file;
new_frame->copy_frame(this, frame_width, frame_height, frame_x, frame_y);
if (new_frame->gray_data)
new_frame->add_to_list(frames);
else // error of some kind, probably range error
delete new_frame;
fprintf(stderr, " Frame at %d/%d (%dx%d - offset %d) %s\n",
frame_x, frame_y, frame_width, frame_height, frame_offset, message);
}
return frame_count;
}
int mmpnm_file::copy(mmpnm_file *source)
{
if (!this || !source)
return -EINVAL;
memset(this, 0, sizeof(*this));
width = source->width;
height = source->height;
color_data = new unsigned char[width * height * 3];
memcpy(color_data, source->color_data, width * height * 3);
gray_data = new unsigned char[width * height];
memcpy(gray_data, source->gray_data, width * height);
return width * height;
}
int mmpnm_file::copy_frame(mmpnm_file *source, int frame_width, int frame_height, int left_x, int top_y)
{
if (!this || !source)
return -EINVAL;
if ( (left_x < 0) || (top_y < 0)
|| ((frame_width + left_x) > source->width)
|| ((frame_height + top_y) > source->height))
{
fprintf(stderr, " Problem clipping %dx%d area at %dx%d from %dx%d image\n",
frame_width, frame_height, left_x, top_y, source->width, source->height);
return -EINVAL;
}
width = frame_width;
height = frame_height;
gray_data = new unsigned char[width * height];
color_data = new unsigned char[width * height * 3];
int gray_index = 0;
int color_index = 0;
for (int y = 0; y < frame_height; ++y)
for (int x = 0; x < frame_width; ++x, ++gray_index, color_index += 3)
{
int source_gray = ((top_y + y) * source->width) + left_x + x;
int source_color = source_gray * 3;
gray_data[gray_index] = source->gray_data[source_gray];
memcpy(&color_data[color_index], &source->color_data[source_color], 3);
}
return frame_width * frame_height;
}
int mmpnm_file::crop(int new_width, int new_height)
{
if (!this || !gray_data || !color_data)
return -EINVAL;
if ((width == new_width) && (height == new_height))
return 0;
unsigned char *old_gray = gray_data;
unsigned char *old_color = color_data;
gray_data = (unsigned char*) memset(new unsigned char[new_width * new_height], 0, new_width * new_height);
color_data = (unsigned char*) memset(new unsigned char[new_width * new_height * 3], 0, new_width * new_height * 3);
int copy_width = new_width;
if (copy_width > width)
copy_width = width;
int copy_height = new_height;
if (copy_height > height)
copy_height = height;
for (int y = 0; y < copy_height; ++y)
{
int source = y * width;
int destination = y * new_width;
for (int x = 0; x < copy_width; ++x, ++destination, ++source)
{
gray_data[destination] = old_gray[source];
memcpy(&color_data[destination * 3], &old_color[source * 3], 3);
}
}
delete old_color;
delete old_gray;
width = new_width;
height = new_height;
return 0;
}
int mmpnm_file::delete_list()
{
int count = 0;
mmpnm_file *scan = this;
while (scan)
{
mmpnm_file *next_file = scan->next;
scan->next = NULL;
delete scan;
scan = next_file;
++count;
}
return count;
}
int mmpnm_file::find_average_luminance(int color)
{
if (!this || !color_data || !gray_data || (color < 0) || (color > 3))
return -EINVAL;
int total = 0;
int pixels = width * height;
if (color < 3)
pixels *= 3;
if (color == 3)
for (int pixel = 0; pixel < pixels; ++pixel)
total += gray_data[pixel];
else
for (int pixel = color; pixel < pixels; pixel += 3)
total += color_data[pixel];
return total / pixels;
}
int mmpnm_file::load(char *filename)
{
int status = 0;
struct stat file_info;
if (stat(filename, &file_info) < 0)
{
status = -errno;
perror(filename);
return status;
}
int descriptor = open(filename, O_RDONLY);
if (descriptor < 0)
{
status = -errno;
perror(filename);
return status;
}
unsigned char *raw_data = new unsigned char [file_info.st_size];
unsigned char *data_end = &raw_data[file_info.st_size];
if (read(descriptor, raw_data, file_info.st_size) < 0)
{
status = -errno;
perror(filename);
close(descriptor);
return status;
}
close(descriptor);
// Process header text
int colors = 1;
int max_value = 255;
unsigned char *data_start = raw_data;
for (int argument = 0; (argument < 4) && (data_start < data_end); ++argument)
{
if (*data_start == '#')
{
--argument; // Comment lines are ignored
while ((data_start < data_end) && (*data_start >= ' '))
++data_start;
}
else if (argument == 0)
{
if (strncmp((char*) data_start, "P6", 2) == 0)
colors = 3;
else if (strncmp((char*) data_start, "P5", 2) == 0)
colors = 1;
else
{
delete raw_data;
fprintf(stderr, "%s: File is not valid PPM or PGM "
"(doesn't start with P5 or P6)\n", filename);
return -EBADF;
}
}
else if (argument == 1)
width = atoi((char*) data_start);
else if (argument == 2)
height = atoi((char*) data_start);
else if (argument == 3)
max_value = atoi((char*) data_start);
// Find end of string
while ((data_start < data_end) && (*data_start > ' '))
++data_start;
// Find end of trailing whitespace
if (argument == 3)
++data_start;
else while ((data_start < data_end) && (*data_start <= ' '))
++data_start;
}
int pixels = width * height;
int bytes_per_color = 1;
if (max_value > 256)
bytes_per_color = 2;
int valid_file_length = (data_start - raw_data) + (bytes_per_color * colors * width * height);
if (valid_file_length > file_info.st_size)
{
delete raw_data;
fprintf(stderr, "File length %d invalid for %d color image, %d bytes/color, %d x %d\n",
file_info.st_size, colors, bytes_per_color, width, height);
return -EBADF;
}
gray_data = new unsigned char[pixels];
color_data = new unsigned char[pixels * 3];
int raw_bytes_per_pixel = colors * bytes_per_color;
int raw_index = 0;
int gray_index = 0;
int color_index = 0;
if (colors == 1) // Grayscale
for (int pixel = 0; pixel < pixels; ++pixel)
{
gray_data[gray_index] = data_start[raw_index];
color_data[color_index] = gray_data[gray_index];
color_data[color_index + 1] = gray_data[gray_index];
color_data[color_index + 2] = gray_data[gray_index];
raw_index += raw_bytes_per_pixel;
gray_index += 1;
color_index += 3;
}
else // RGB
for (int pixel = 0; pixel < pixels; ++pixel)
{
gray_data[pixel] = (data_start[raw_index] / 3)
+ (data_start[raw_index + bytes_per_color] / 3)
+ (data_start[raw_index + (2 * bytes_per_color)] / 3);
color_data[color_index] = data_start[raw_index];
color_data[color_index + 1] = data_start[raw_index + bytes_per_color];
color_data[color_index + 2] = data_start[raw_index + (2 * bytes_per_color)];
raw_index += raw_bytes_per_pixel;
gray_index += 1;
color_index += 3;
}
delete raw_data;
return pixels;
}
int mmpnm_file::normalize_gray()
{
if (!this || !gray_data)
return -EINVAL;
int pixels = width * height;
// Find darkest and lightest points
int low = 255;
int high = 0;
for (int pixel = 0; pixel < pixels; ++pixel)
{
if (low > gray_data[pixel])
low = gray_data[pixel];
if (high < gray_data[pixel])
high = gray_data[pixel];
}
// Normalize to spread over entire spectrum
double ratio = (high - low) / 256.0;
if (ratio > 0)
for (int pixel = 0; pixel < pixels; ++pixel)
{
int value = (int)((gray_data[pixel] - low) / ratio);
if (value > 254)
value = 254;
else if (value < 0)
value = 0;
gray_data[pixel] = (unsigned char) value;
}
return pixels;
}
int mmpnm_file::normalize_color(int color)
{
if (!this || !color_data || (color < 0) || (color > 2))
return -EINVAL;
int pixels = width * height * 3;
// Find darkest and lightest points
int low = 255;
int high = 0;
for (int pixel = color; pixel < pixels; pixel += 3)
{
if (low > color_data[pixel])
low = color_data[pixel];
if (high < color_data[pixel])
high = color_data[pixel];
}
// Normalize to spread over entire spectrum
double ratio = (high - low) / 256.0;
if (ratio > 0)
for (int pixel = color; pixel < pixels; pixel += 3)
{
int value = (int) ((color_data[pixel] - low) / ratio);
if (value > 255)
value = 255;
if (value < 0)
value = 0;
color_data[pixel] = (unsigned char) value;
}
return width * height;
}
int mmpnm_file::save(char *filename)
{
int status = 0;
char header[256];
unsigned char *data;
int data_length = 0;
if (strstr(filename, ".pgm"))
{
sprintf(header, "P5\n%d %d\n255\n", width, height);
data = gray_data;
data_length = width * height;
}
else
{
sprintf(header, "P6\n%d %d\n255\n", width, height);
data = color_data;
data_length = width * height * 3;
}
int descriptor = open(filename, O_WRONLY | O_TRUNC | O_CREAT, 0644);
if (descriptor < 0)
{
status = -errno;
perror(filename);
}
else if (write(descriptor, header, strlen(header)) < 0)
{
status = -errno;
perror(filename);
}
else if (write(descriptor, data, data_length) < 0)
{
status = -errno;
perror(filename);
}
if (descriptor >= 0)
close(descriptor);
return status;
}
int mmpnm_file::save_frames_to_separate_files(int is_black_and_white, int starting_frame_number)
{
int frame_number = starting_frame_number;
for (mmpnm_file *frame = this; frame; ++frame_number, frame = frame->next)
{
char filename[256];
if (is_black_and_white)
sprintf(filename, "frame%05d.pgm", frame_number);
else
sprintf(filename, "frame%05d.ppm", frame_number);
printf("Saving %s\n", filename);
int status = frame->save(filename);
if (status < 0)
return status;
}
return frame_number;
}
int mmpnm_file::shift(int x_shift, int y_shift)
{
unsigned char *old_gray = gray_data;
unsigned char *old_color = color_data;
gray_data = (unsigned char*) memcpy(new char[width * height], gray_data, width * height);
color_data = (unsigned char*) memcpy(new char[width * height * 3], color_data, width * height * 3);
for (int y = 0; y < height; ++y)
for (int x = 0; x < width; ++x)
{
int shifted_x = (x + width + x_shift) % width;
int shifted_y = (y + height + y_shift) % height;
int source = (y * width) + x;
int destination = (shifted_y * width) + shifted_x;
gray_data[destination] = old_gray[source];
memcpy(&color_data[destination * 3], &old_color[source * 3], 3);
}
delete old_gray;
delete old_color;
return 0;
}
int mmpnm_file::shift(float x_shift, float y_shift)
{
mmpnm_file original;
original.copy(this);
clear();
for (int y = 0; y < height; ++y)
for (int x = 0; x < width; ++x)
{
add_point(original.gray_data[(y * width) + x], x + x_shift, y + y_shift, -1);
add_point(original.color_data[(y * width * 3) + x + 0], x + x_shift, y + y_shift, 0);
add_point(original.color_data[(y * width * 3) + x + 1], x + x_shift, y + y_shift, 1);
add_point(original.color_data[(y * width * 3) + x + 2], x + x_shift, y + y_shift, 2);
}
return 0;
}
��������������������������������������������mmsuper8/mmavi.h������������������������������������������������������������������������������������0100644�0000764�0000764�00000011512�10061131524�013710� 0����������������������������������������������������������������������������������������������������ustar �michael�������������������������michael����������������������������������������������������������������������������������������������������������������������������������������������������������������������������������������������������������������/***************************************************************************
mmavi - Classes for listing and creating AVI files
-------------------
begin : 6/5/2004
copyright : (C) 2004 by Michael Minn
email : see www.michaelminn.com
-------------------
This program is free software; you can redistribute it and/or modify
it under the terms of version 2 of the GNU General Public License as
published by the Free Software Foundation.
***************************************************************************/
#ifndef MMAVI_H
#define MMAVI_H
#include
#include "mmpnm.h"
class mmavi_container_chunk
{
public:
char chunk_name[4];
int chunk_length;
char content_type[4];
};
class mmavi_avi_header
{
public:
char chunk_name[4];
int chunk_length;
int microseconds_per_frame;
int max_bytes_per_second;
int reserved1;
int flags;
int total_frames;
int initial_frames;
int streams;
int suggested_buffer_size;
int width;
int height;
int scale;
int rate;
int start;
int length;
mmavi_avi_header() { memset(this, 0, sizeof(*this)); }
int list()
{
printf(" AVI Header (%d/%d bytes)\n", chunk_length, sizeof(*this));
printf(" ms/frame: %d\n", microseconds_per_frame);
printf(" bytes/sec: %d\n", max_bytes_per_second);
printf(" flags: %x\n", flags);
printf(" total frames: %d\n", total_frames);
printf(" initial frames: %d\n", initial_frames);
printf(" streams: %d\n", streams);
printf(" suggested buffer: %d\n", suggested_buffer_size);
printf(" dimensions: %d x %d\n", width, height);
if (scale)
printf(" rate %d / scale %d = %d ticks/second\n", rate, scale, rate / scale);
printf(" start: %d\n", start);
printf(" length: %d\n", length);
return 0;
}
};
class mmavi_stream_header
{
public:
char chunk_name[4];
int chunk_length;
char stream_type[4];
char stream_handler[4];
int flags;
int reserved;
int initial_frames;
int scale;
int rate;
int start;
int length;
int suggested_buffer_size;
int quality;
int sample_size;
int reserved2[2];
mmavi_stream_header() { memset(this, 0, sizeof(*this)); }
int list()
{
printf(" Stream (%d/%d bytes)\n", chunk_length, sizeof(*this));
printf(" Type: %.4s, handler %.4s\n", stream_type, stream_handler);
printf(" flags: %d\n", flags);
printf(" initial frames: %d\n", initial_frames);
printf(" rate %d / scale %d = %d ticks/second\n", rate, scale, rate/ scale);
printf(" start: %d\n", start);
printf(" length: %d ticks\n", length);
printf(" suggested buffer: %d\n", suggested_buffer_size);
printf(" quality: %d\n", quality);
printf(" sample size: %d\n", sample_size);
return 0;
}
};
class mmavi_image_format // bitmapinfoheader
{
public:
char chunk_name[4];
int chunk_length;
int structure_size;
int width;
int height;
short planes; // always 1?
short depth;
int compression; // 0=rgb, 1=8-bit indexed, 2=4-bit indexed, 3=16/32bit rgb, 4=jpeg, 5=png
int byte_size;
int pixels_per_meter;
int colors_used;
int minimum_colors;
char color_table[]; // array of b/g/r/a bytes
mmavi_image_format() { memset(this, 0, sizeof(*this)); }
int list()
{
printf(" Image format (%d/%d bytes)\n", chunk_length, chunk_length + 8);
printf(" dimensions: %d x %d\n", width, height);
printf(" structure size: %d\n", structure_size);
printf(" planes: %d\n", planes);
printf(" depth: %d\n", depth);
printf(" compression algorithm: %d\n", compression);
printf(" size: %d bytes\n", byte_size);
printf(" resolution: %d/meter\n", pixels_per_meter);
printf(" colors: %d (min %d)\n", colors_used, minimum_colors);
return 0;
}
};
class mmavi_sound_format // waveformatex
{
public:
char chunk_title[4];
unsigned int chunk_length;
unsigned short format_type;
unsigned short channel_numbers;
unsigned int sample_rate;
unsigned int bytes_per_second;
unsigned short bytes_per_sample;
unsigned short bits_per_sample;
mmavi_sound_format() { memset(this, 0, sizeof(*this)); }
int list()
{
printf(" WAV Information (%d/%d bytes)\n", chunk_length, sizeof(*this));
printf(" format: %d\n", format_type);
printf(" channels: %d\n", channel_numbers);
printf(" rate: %d\n", sample_rate);
printf(" bytes/second: %d\n", bytes_per_second);
printf(" bits/sample: %d\n", bits_per_sample);
return 0;
}
};
class mmavi_file
{
public:
mmavi_file() { memset(this, 0, sizeof(*this)); frames_per_second = 18; }
int open_file(char *filename, int is_black_and_white, int frames_per_second);
int add_frame(mmpnm_file *frame);
int close_file();
private:
int descriptor;
int frame_count;
int frame_width;
int frame_height;
int is_black_and_white;
int frames_per_second;
int write_header();
};
int mmavi_list(char *filename);
#endif
����������������������������������������������������������������������������������������������������������������������������������������������������������������������������������������������������������������������������������������������������������������������������������������������������������������������������������������������������������������������������������������������������������������������������������������������������������������������������������������������������������������������������������������������������������������������������������������������������������������������������������������������������������������������������������������������������������������������������������������������������������������������������������������������������������������������������������������������������������������������������������������������������������������������������������������������������������������������������������������������������������������������������������������������������������������������������������������������������������������������������������������������������������������������������������������������������������������������������������������������������������������������������������������������������������������������������������������������������������������������������������������������������������������������������������������������������������������������������������������������������������������������������������������������������������������������������������������������������������������������������������������������������������������������������������������������������������������������������������������������������������������������������������������������������������������������������������������������������������������������������������������������������������������������������������������������������������������������������������������������������������������������������������������������������������������������������������������������������������������������������������������������������������������������������������������������������������������������������������������������������������������������������������������������������������������������������������������������������������������������������������������������������������������������������������������������������������������������������������������������������������������������������������������������������������������������������������������������������������������������������������������������������������������������������������������������������������������������������������������������������������������������������������������������������������������������������������������������������������������������������������������������������������������������������������������������������������������������������������������������������������������������������������������������������������������������������������������������������������������������������������������������������������������������������������������������������������������������������������������������������������������������������������������������������������������������������������������������������������������������������������������������������������������������������������������������������������������������������������������������������������������������������������������������������������������������������������������������������������������������������������������������������������������������������������������������������������������������������������������������������������������������������������������������������������������������������������������������������������������������������������������������������������������������������������������������������������������������������������������������������������������������������������������������������������������������������������������������������������������������������������������������������������������������������������������������������������������������������������������������������������������������������������������������������������������������������������������������������������������������������������������������������������������������������������������������������������������������������������������������������������������������������������������������������������������������������������������������������������������������������������������������������������������������������������������������������������������������������������������������������������������������������������������������������������������������������������������������������������������������������������������������������������������������������������������������������������������������������������������������������������������������������������������������������������������������������������������������������������������������������������������������������������������������������������������������������������������������������������������������������������������������������������������������������������������������������������������������������������������������������������������������������������������������������������������������������������������������������������������������������������������������